
Spy Shots
-
redrustbucket

- bitGangsta'
- Posts: 363
- Joined: Wed Mar 15, 2006 9:41 pm
- Location: sunny acres, fl
Spy Shots
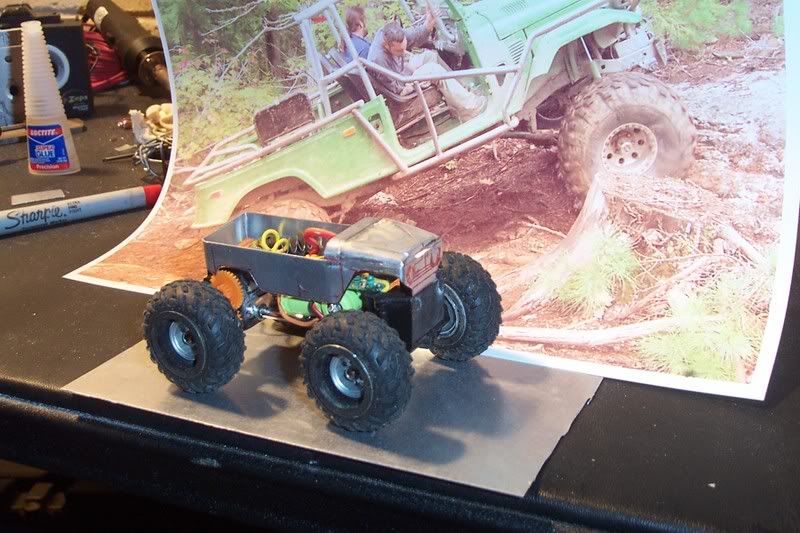
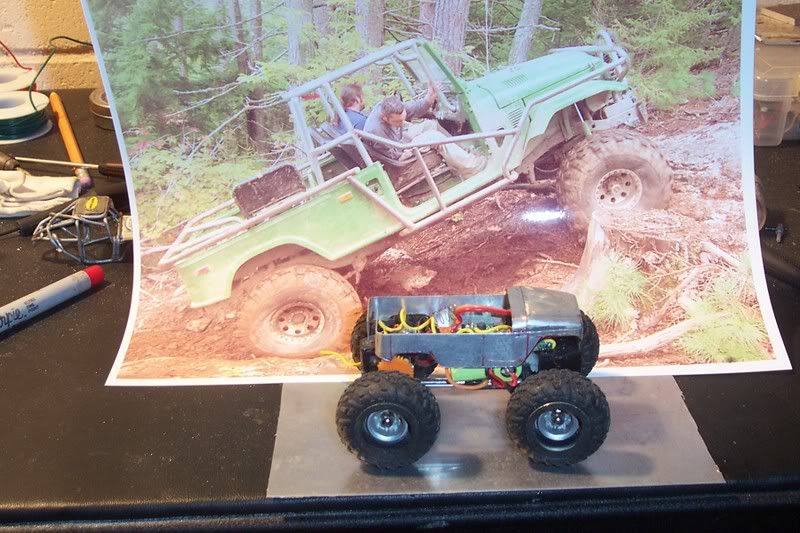
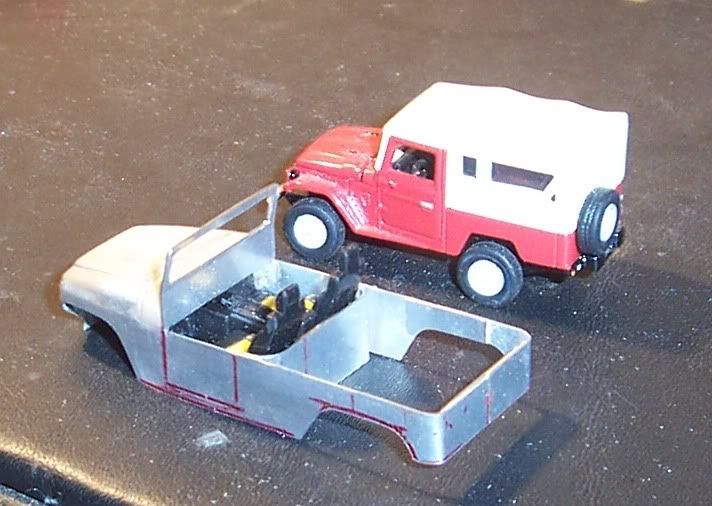
New crawler I'm building for a buddy of mine. That's me riding shotgun on 120 acres worth of trails on his land in upstate NH.
specs:
6061 T6 aluminum body
aw fawk it I ain't typin' the rest
specs:
6061 T6 aluminum body
aw fawk it I ain't typin' the rest
The devil made me do it the first time, the second time I done it on my own...
tlca # 14622
tlca # 14622
-
ynad

- bitNinja
- Posts: 776
- Joined: Fri Apr 30, 2004 12:22 am
- Location: NYC/NJ
-
frizzen
- bitDisciple
- Posts: 1730
- Joined: Wed Aug 03, 2005 7:48 am
- Location: Big Left Turn, Indiana
- Contact:
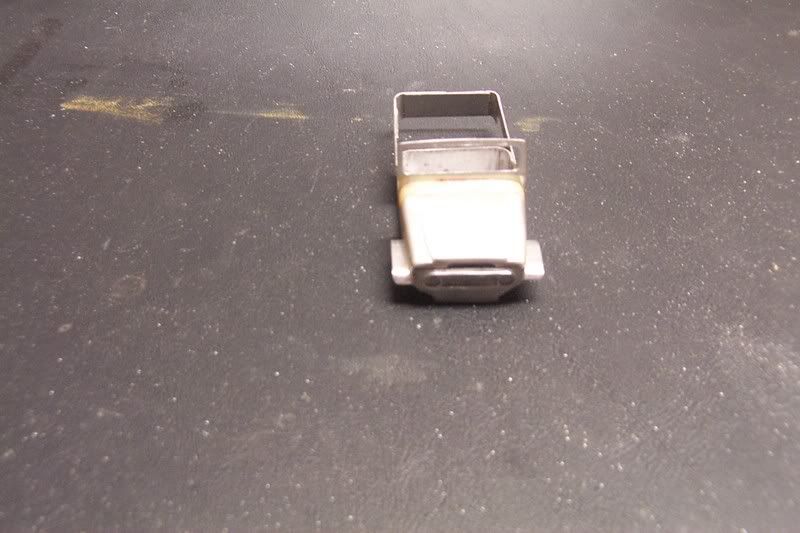
Looks like a stretched, tri-celled, articulated, shaved zz-m. Running on some 1/18 atv wheels?
So is that pic like a CJ-7, or FJ-40, or like a landcruser, or what? Well other than obviously being a badass ride!
So is that pic like a CJ-7, or FJ-40, or like a landcruser, or what? Well other than obviously being a badass ride!
Jack of all trades, master of none; yet often better than master of one.
-
End genital mutilation, don't circumcise. Restore your fore'
-
End genital mutilation, don't circumcise. Restore your fore'


-
SHAUN
- bitDisciple
- Posts: 1462
- Joined: Wed Oct 05, 2005 10:35 am
- Location: On the trail
- Contact:
-
hue35

- bitPimp
- Posts: 2244
- Joined: Tue May 20, 2003 3:03 pm
- Location: all up in ya fuckin' mind, yo.
Wow! That body fabrication is incredible! You got any progress pics on how that body got to that point? Or maybe a brief description of how you convinced the aluminum to take that shape? Man, that's pretty damn complex up front... is there some soldering* or welding going on, or is that really one piece?
*Coupla years ago, at the state fair, I saw this special rod that allowed you to solder aluminum with a propane torch... it looked just like soldering copper pipe. Anyone ever tried that shit?
*Coupla years ago, at the state fair, I saw this special rod that allowed you to solder aluminum with a propane torch... it looked just like soldering copper pipe. Anyone ever tried that shit?

-
redrustbucket
- bitGangsta'
- Posts: 363
- Joined: Wed Mar 15, 2006 9:41 pm
- Location: sunny acres, fl
Yep, with a few other mods thrown in for good measure.frizzen wrote:Looks like a stretched, tri-celled, articulated, shaved zz-m. Running on some 1/18 atv wheels?
So is that pic like a CJ-7, or FJ-40, or like a landcruiser, or what? Well other than obviously being a badass ride!
It's not a j**p though 40s are commonly mistaken for them. It's a stretched FJ40 ( landcruiser ) body with the cab and top sectioned into a fj45 ( pickup version ) on an fj55 ( wagon ) frame. It has a chevy 350 under the hood running into an sm465 4 sp. tranny. It's sitting on locked f/r toyota axles with Longfield axle shafts and birfs. 2" BDS lift, sprung over for about 6 - 8" of total lift over 39.5" super swampers.
The cage in the rear in the 2nd pic is my O.G. crawler body I made over a year ago when I first started building crawlers. The cage for this one will be out of the same material, 1/16" aluminum tubing.DarkTari wrote:Is that the roll bar setup behind the 2nd pic ? Lookin at it again, looks too short so
probably not. Try large paper clips if you're putting one together!
That is gonna be da shit !
Yes, hopefully it will be the shit if everything works out the way I hope it will.
Thanks. These are the first pics I've taken of it.hue35 wrote:Wow! That body fabrication is incredible! You got any progress pics on how that body got to that point? Or maybe a brief description of how you convinced the aluminum to take that shape? Man, that's pretty damn complex up front... is there some soldering* or welding going on, or is that really one piece?
*Coupla years ago, at the state fair, I saw this special rod that allowed you to solder aluminum with a propane torch... it looked just like soldering copper pipe. Anyone ever tried that shit?
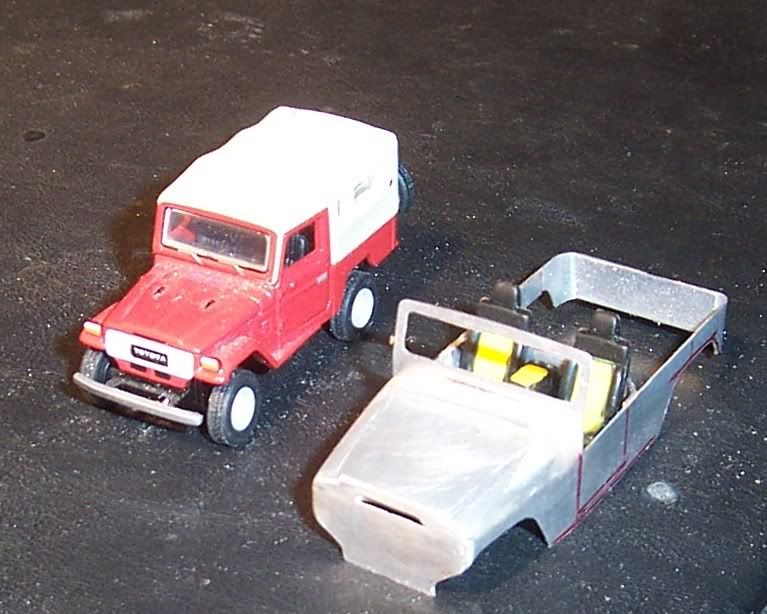
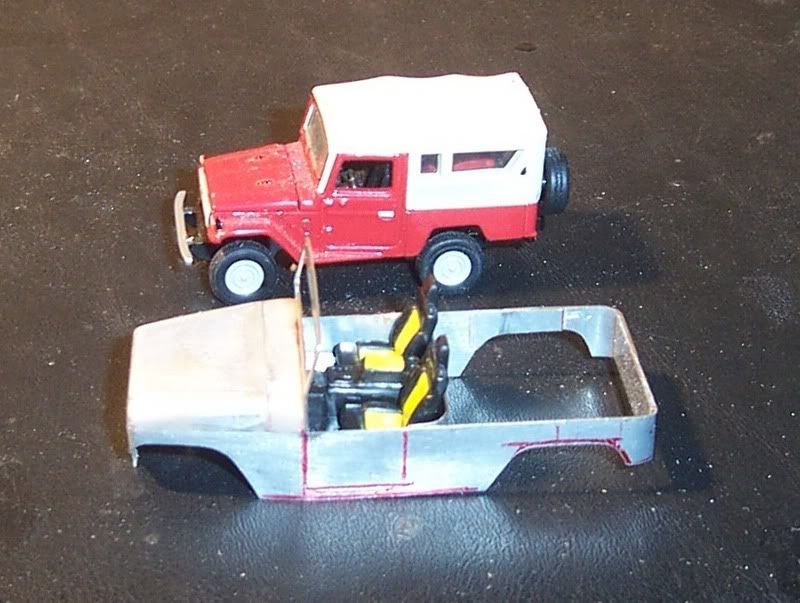
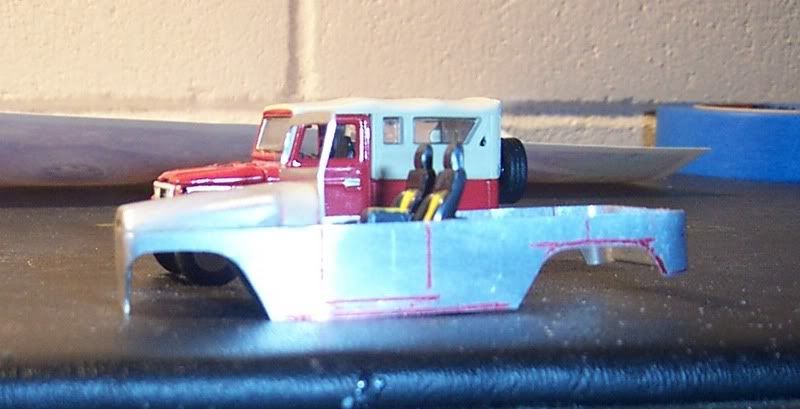
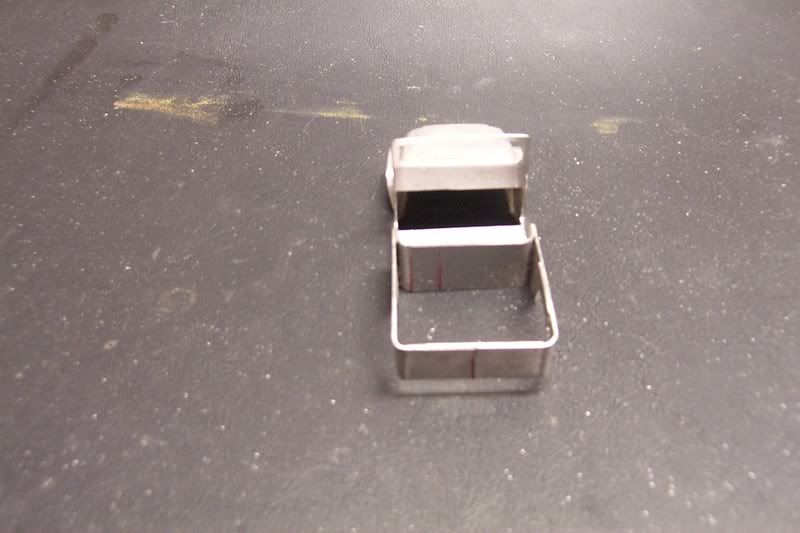
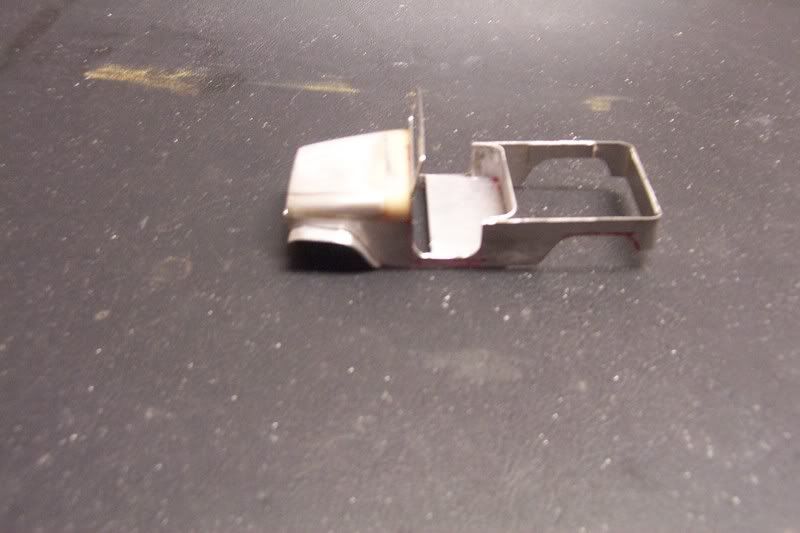
The pictures are a bit deceiving as to the complexity I think, though it definitely wasn't easy. The body is 3 separate pieces so far. I started by making the hood first out of a chunk of solid aluminum, not the .016 sheet I used for the rest of the body.
I carved the hood mostly using an angle grinder ( dangerous but quick ) and finished it with hand files and a dremel. I then used the dremel to carve out the underside of the hood to about 1/16" thick. I would've liked to get it thinner to save more weight but I didn't want to risk ruining it by going through as I don't have any calipers to check the thickness.
Then going off my fullsize 40, a 1/64th 40 and the picture I kind of eyeballed/measured the shape for the rest of the body onto a flat sheet of .016 7075 T6 I snagged from work. Building airplanes for a living has its benefits when trying to come across materials.
I added the strip for the cowl cuz I wasn't happy with the dimensions. Everything is tacked together with superglue right now until I get it where I like it then I will probably epoxy it to hold it and fill some gaps so I can sand it smooth.
My original plan was to Alumiweld ( prob. what you saw at the fair Hue ) the whole thing together but I had a hell of a time getting the skin to attach to the hood. The differences in thickness made it extremely tricky for me to heat it properly without destroying the thinner skin of the body. I have been able to braze the thin sheet stock together quite well so I may braze the rest of it and just epoxy on the hood. I have had pretty good results brazing the 1/16" alum. tubing for the rollcage together. Hopefully I will be able to weld at least the cage to keep it closer to the actual truck, otherwise I will have to change it some for bond strength if I epoxy it.The Alumiweld looks like it actually welds the aluminum together, instead of just brazing it. Going by the explanation on the package I think it's partly a chemical reaction or something rather than the heat melting the metal together.
I wasn't really planning on posting this one up until it was done but I figured you guys might want to see some of the progress. Most everything I do is an experiment so it changes a lot based on what works and what doesn't. The chassis gave me fits for a while stripping out rear pinions because of the axle steer which would affect the gear mesh. I tried JB welding an x mod bearing in but even that didn't hold up. I finally ended up brazing the bearing to a very thin sheet of sheetmetal, sleeving the driveshaft to fit tight inside the bearing and then routing out the rear axle housing to fit it and then bolting the sheetmetal to the housing. Hasn't moved a bit since and crawls better too because the axle doesn't " walk " under torque. If you look close in the 1st pic you can make it out.
I promised this one almost a year ago and have had numerous set backs which led me to the mods on it now. Hopefully it will come together soon.
Here's a link for the Alumiweld if anyone is interested:
http://www.alumiweld.com/index.html
The devil made me do it the first time, the second time I done it on my own...
tlca # 14622
tlca # 14622
-
redrustbucket
- bitGangsta'
- Posts: 363
- Joined: Wed Mar 15, 2006 9:41 pm
- Location: sunny acres, fl
-
redrustbucket
- bitGangsta'
- Posts: 363
- Joined: Wed Mar 15, 2006 9:41 pm
- Location: sunny acres, fl

-
SHAUN
- bitDisciple
- Posts: 1462
- Joined: Wed Oct 05, 2005 10:35 am
- Location: On the trail
- Contact:
-
crazydave

- bitPimp
- Posts: 6874
- Joined: Thu Apr 17, 2003 9:05 am
- Location: Koolsville
-
redrustbucket
- bitGangsta'
- Posts: 363
- Joined: Wed Mar 15, 2006 9:41 pm
- Location: sunny acres, fl
-
guerd87

- bitPlaya'
- Posts: 176
- Joined: Sun Sep 17, 2006 5:32 pm
- Location: Gold Coast, Australia