Page 1 of 2
Aluma-bit comming soon
Posted: Sat Dec 08, 2007 5:50 am
by sidewinder
Ok, I just thought I'd go ahead and post some teaser pics of my EOTYC entry. It should be done sometime next week.
First I realized that I wanted something completly different. That's not easy here since there have so many great bit/zips. so I started with a custom made space frame.
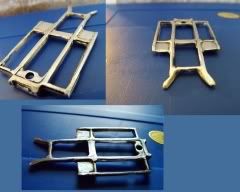
The next few shots take a little explaining. I found a cool site where people hade home foundies. While surfing I found a how to make your own charcoal fired foundry. So one worn out propain tank and a hair-dryer made the basis for this next part.
I cut up an old bit and a muscle machines rc for doner parts for the chassis, and cast them in aluminum.
The only problem was, being completely new to this I never thought of the fact that steel (the frame) and alumnium don't weld together. So I have to admit to a little cheating...its called JB Weld. Which as luck would have it will stick just about anything together!
That's it for now. more soon.
Posted: Sat Dec 08, 2007 8:51 am
by SHAUN
Holley hell!!!! That is awesome stuff man! Great work.
Posted: Sat Dec 08, 2007 9:02 am
by crazydave
That's some good stuff.

Looks like you're using the motorized steering from the MM. Good call. Just don't forget to insulate your electronics well. Wouldn't want anything to short on that chassis.
Posted: Sat Dec 08, 2007 7:10 pm
by sidewinder
crazydave wrote:That's some good stuff.
Looks like you're using the motorized steering from the MM. Good call. Just don't forget to insulate your electronics well. Wouldn't want anything to short on that chassis.
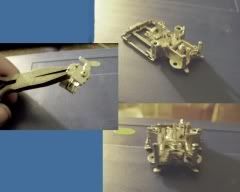
Thanks guys, actualy dave I thought about the shorting problem and coated the board wth liquid electrical tape. unfortunately I got in a hurry and didn't get all of the battery wires coated...so battery number two is liquid and tape coated. Then I must have torn through the liquid ele. tape and so board #2 is double insulated as well. I have coated the inside of the battery support as well. I am further along than the first post but I hadn't transfered the pics from the camera yet. I'm going to do that latter tonight if I can.
Posted: Sat Dec 08, 2007 8:40 pm
by payaso
Great job so far man. The parts look great. Can't wait to see this thing come together.
Kudos for going way outside the box.
silla

Posted: Sat Dec 08, 2007 8:41 pm
by sg219
Lookin' damn good!

I think you might also need to do a "how-to" on how you cast that and the process.
What body? (or is that TOP SECRET till the entry)
Posted: Sat Dec 08, 2007 9:08 pm
by redrustbucket
Freakin' sick. I agree w/ sg. A how to or a point in the right direction would be sweet. There are a bunch of die casts that would work well cast in aluminum to save weight. Nice work dude.
Posted: Sat Dec 08, 2007 9:17 pm
by sidewinder
sg219 wrote:Lookin' damn good!
I think you might also need to do a "how-to" on how you cast that and the process.
What body? (or is that TOP SECRET till the entry)
Thanks. I was thinking about not so much a tutorial since I only got an average of one out of 8 or 9 castng attempts to come out the way I wanted. I'm thinking more like a here's how this works sometimes post. I have a lot to learn still. The biggest problem I have now is Ohio's in a wet time of year right now and I don't have anyplace inside that's ventilated well enough to not risk death or setting the garage on fire--which I already did once, (the fire, not the dieing thing

) But as soon as we get some dry time I'll be happy to post a complete how-to, and since want to make a bigger furnace anyway, I can walk people through the whole process. I just picked up a book on how to do this right.
Anyway, here's some more pics of the chassis in mock-up stage.

Actualy I was going to post some pics of the raw cast of the body tonight but since you planted the top secret idea in my head maybe I'll just post a couple of teaser close-ups (taken with my overly crapy camera)and let people guess

Oh crap, I just noticed that when I tried to make the pictures light enough to see they got a god-awful gold tint in places that should look silver. like the engin on the top left of the first group. Sorry, I'll see if I can borrow a better camera and get clearer shots. These were so dark that they were hard to see before I adjusted the light. I'll do better.
Posted: Sat Dec 08, 2007 11:27 pm
by frizzen
Killer looking frame! How heavy is it so far?
What's the tiny oil-filled shock from?
That body teaser set looks like a Shelby Cobra 427

Posted: Sat Dec 08, 2007 11:44 pm
by betty.k
that's some damn fine work there! looking forward to more!
Posted: Sun Dec 09, 2007 1:34 am
by sidewinder
frizzen wrote:Killer looking frame! How heavy is it so far?
What's the tiny oil-filled shock from?
That body teaser set looks like a Shelby Cobra 427
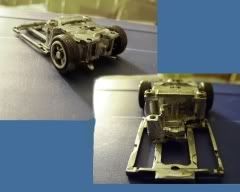
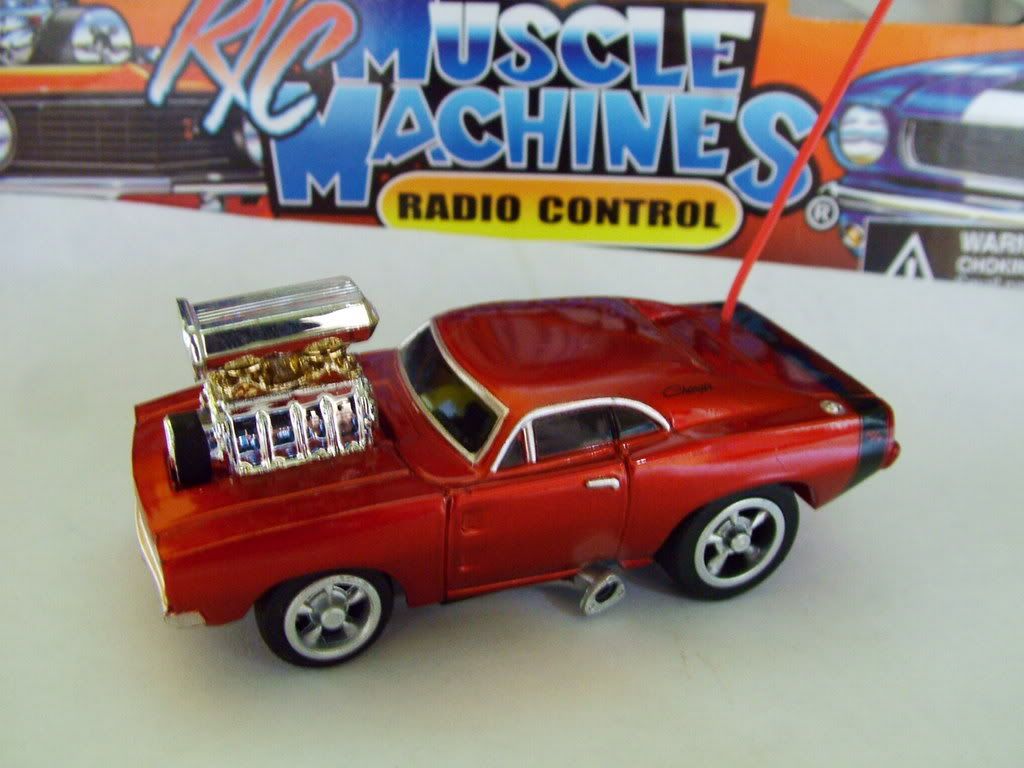
It's amazing light...considering. I don't have scales around but when I hold it and a muscle machines rc in each hand they feel nearly the same. Of course the muscle machine's got that heavy plastic blower on the hood so its just a little heavier than a zip. here's a shot of the muscle machines car, with the big chrome nose weight.
This pic is with my buddy Dave's Cannon Rebel...as opposed to the crappy little generic camera I have. I've got to save some money and get something manufactured by somebody who isn't ashamed to put thier name on it.
The shock is from an first gen xmod. Its from TheToyz on ebay here's a link to a similar shock if you go to their store from the link they may still have some.
http://cgi.ebay.com/xmods-GPM-Black-all ... dZViewItem
A 427 what? Uhm,

I don't think I've ever heard of such a car

Damn, I knew that nose was too distinctive. Oh well, life goes on.
Posted: Sun Dec 09, 2007 4:23 am
by frizzen
Pffft, I probably could have guessed that car from the hood picture alone. *drool* Semi-comp, or full on racing?
Only after I saw that did I take the Aluma-Bit thing farther and realize how that's the perfect body for that project name. Yay, I win! More body pics!!!

Posted: Sun Dec 09, 2007 6:22 am
by sidewinder
frizzen wrote:Pffft, I probably could have guessed that car from the hood picture alone. *drool* Semi-comp, or full on racing?
Only after I saw that did I take the Aluma-Bit thing farther and realize how that's the perfect body for that project name. Yay, I win! More body pics!!!
Ah yes, pactienc grasshopper. Pictures will come when they are supposed to come. (that sounds better if you read it with a bad chinese accent).
The idea for the aluminum came from the car. At first I was going to just attempt to cast a body, but it didn't seem right to put it on a plastic chassis. So...well the whole damned thing snowballed. I'll post a shot of the raw unpolished/ unpainted body here and get some more soon.

The top one came out nearly perfect with only minor clean-up. The bottom one...well. It took a lot of clean up, Somehow the sand seemed to shift or something and the metal leaked between the boxes. But the car part wasn't too bad it was thick in some spots where the sand must have had air spaces?
I have a friend who works at a forge and he said I was lucky to any good cast (out of twelve tries) because I placed the master in the sand "wrong" and because it has undercuts that can't be done. Somehow they were done although I think I know what he means because it took a bunch of tries each time to get the master out of the sand without destroying the impression. The bad cast that I recycled (until they were right) were bad because the areas where it is undercut (the grill, the fenders, etc.) collapsed before the metal was poured. I finaly had to cut the grill out and cast is separate. but it looks ok (?) when put back in bottom picture).
It is amazing what you can do when no one tells you it can't be done. And so far its only take three months.

Posted: Mon Dec 10, 2007 10:22 am
by ibjamn
I have nothing else to add, everyone has already spoken for me....

Posted: Mon Dec 10, 2007 11:52 am
by ynad
like he said ^^^
