
Pro Street Chevelle
-
crazydave

- bitPimp
- Posts: 6874
- Joined: Thu Apr 17, 2003 9:05 am
- Location: Koolsville
Pro Street Chevelle
My old camera broke, and I've been without for a few weeks. I'm just getting caught up, so don't think I just went on a modding spree. This is just my usual one quick mod a week thing. 
This is a good story of how trial and error can finally work out.
The Chevelle was another body that I thought RS had done a really nice job on. I had only added the alloys and stacks sticking out the hood becuase I had them and wanted to apply them to something, and this seemed the car for it.
This car had 2 issues. For one, the paint was funky. It was mostly all glossy, but the passenger side was all rough, dull and kinda odd. I had to clear coat over the decals (I added them later, I thought they were in the pic), and when the clear hit the passenger side, really bad things happened. So I discontinued clear coating, and rubbed that side out. Over time the decals wore half off, and the second problem is that it was a SE, and I was breaking them at the time. So when I killed the chassis, I retired the body.
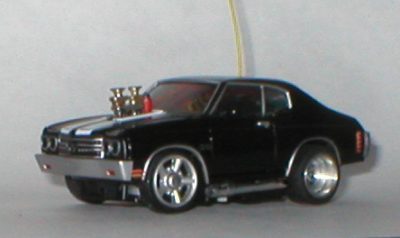
I wanted to revive it several times, but I had stold the stacks for my CarToons Camaro, and wasn't sure what to fill the hole in the hood with. So what I did was make this hood scoop by stacking ZZ packaging in the approximate shape, and sanding it smooth. I was really proud of that, so I had to make this car work, but even though I gave it a good sanding, when the grey hit it, really bad things happened again, so I sanded at it, I managed to save the top half, I figured I had nothing left to lose at this point and got experimental. I masked off the top half, and brushed on some Black water based Testors Acrylic across the bottom, and level sanded it. For separation I tried masking a thin red stripe, but the thinner red paint bled horribly. Once again decided I had nothing left to lose, I sanded the red off, then laid the stripe by hand, with no masking. I was so freakin' amazed with myself, but then I had to do it again on the passenger side. On that side I screwed up a little, and had to touch up the black. Then I felt kinda cocky, and decided to do all the window trim in black without masking. I think I pulled that off pretty well too. Me and that brush were getting along great that day.
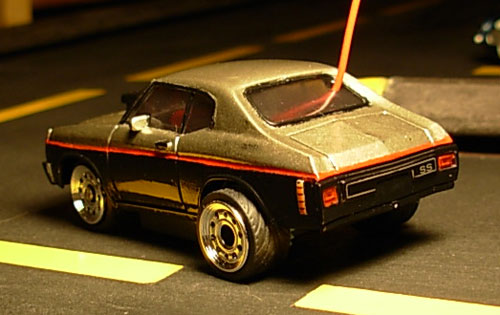
The only bummer for me in the end is that in a couple spots, on the driver's side rear fender, and the trunk lid, I guess I had nearly sanded through, and the clear thinned the grey out. Oh well though, a paint job this old is gonna get oxidized.
Remember that Pro Street style from the 80s? That's not what I was going for, but I think it fits that theme perfect.
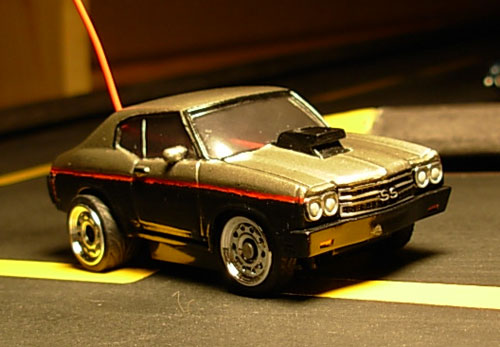
Its on a bone stock OG Zip Zap chassis, with the spring front end. This body just sits right on this chassis, without haveing to mod the tabs.
So despite any flaws, I love this car because of all the work I did by hand on it. I'm glad I kept my cool, because I normally would have lost my temper by this point.
This is a good story of how trial and error can finally work out.
The Chevelle was another body that I thought RS had done a really nice job on. I had only added the alloys and stacks sticking out the hood becuase I had them and wanted to apply them to something, and this seemed the car for it.
This car had 2 issues. For one, the paint was funky. It was mostly all glossy, but the passenger side was all rough, dull and kinda odd. I had to clear coat over the decals (I added them later, I thought they were in the pic), and when the clear hit the passenger side, really bad things happened. So I discontinued clear coating, and rubbed that side out. Over time the decals wore half off, and the second problem is that it was a SE, and I was breaking them at the time. So when I killed the chassis, I retired the body.
I wanted to revive it several times, but I had stold the stacks for my CarToons Camaro, and wasn't sure what to fill the hole in the hood with. So what I did was make this hood scoop by stacking ZZ packaging in the approximate shape, and sanding it smooth. I was really proud of that, so I had to make this car work, but even though I gave it a good sanding, when the grey hit it, really bad things happened again, so I sanded at it, I managed to save the top half, I figured I had nothing left to lose at this point and got experimental. I masked off the top half, and brushed on some Black water based Testors Acrylic across the bottom, and level sanded it. For separation I tried masking a thin red stripe, but the thinner red paint bled horribly. Once again decided I had nothing left to lose, I sanded the red off, then laid the stripe by hand, with no masking. I was so freakin' amazed with myself, but then I had to do it again on the passenger side. On that side I screwed up a little, and had to touch up the black. Then I felt kinda cocky, and decided to do all the window trim in black without masking. I think I pulled that off pretty well too. Me and that brush were getting along great that day.
The only bummer for me in the end is that in a couple spots, on the driver's side rear fender, and the trunk lid, I guess I had nearly sanded through, and the clear thinned the grey out. Oh well though, a paint job this old is gonna get oxidized.
Remember that Pro Street style from the 80s? That's not what I was going for, but I think it fits that theme perfect.
Its on a bone stock OG Zip Zap chassis, with the spring front end. This body just sits right on this chassis, without haveing to mod the tabs.
So despite any flaws, I love this car because of all the work I did by hand on it. I'm glad I kept my cool, because I normally would have lost my temper by this point.
-
steelwoolghandi

- bitPimp
- Posts: 1696
- Joined: Fri Jun 11, 2004 11:53 am
- Location: RIGHT BEHIND YOU!!
- Contact:
-
CaboWabo
- Site Admin
- Posts: 10259
- Joined: Tue Dec 10, 2002 4:05 pm
- Location: The Adult Table
- Contact:

-
betty.k

- bitPimp
- Posts: 4090
- Joined: Fri Dec 26, 2003 4:52 pm
- Location: la la land
- Contact:

-
crazydave
- bitPimp
- Posts: 6874
- Joined: Thu Apr 17, 2003 9:05 am
- Location: Koolsville
They're from the second to last wheel set from RS, the ones where they introduced the fatties. I drill out all the little holes with an Exacto, and they just come to life.steelwoolghandi wrote:Are the wheels from the German group buy? They look sick on that car.
Better grab 'em while you can, they're on clearance for 97 cents, and this was my RS's last set.
Can you say executed, when it was all just one big accident?betty.k wrote:great theme man, perfectly executed too!
Really, I was kinda thinking the Black and Silver would make it Foose-ish, since he seems to favor those colors, but then the next day on the latest Overhaulin' they redid an old Firebird that had the hoodscoop similar to mine, and they just ripped on that thing for the whole show. So I'm like, fine, its not Foose-ish. This is straight up Hot Rod Magazine circa about '85.
-
ynad

- bitNinja
- Posts: 776
- Joined: Fri Apr 30, 2004 12:22 am
- Location: NYC/NJ
-
steelwoolghandi
- bitPimp
- Posts: 1696
- Joined: Fri Jun 11, 2004 11:53 am
- Location: RIGHT BEHIND YOU!!
- Contact:
Dang I went to RS and saw nothing like this if anyone sees some and wants to do a pimp a favor???crazydave wrote:They're from the second to last wheel set from RS, the ones where they introduced the fatties. I drill out all the little holes with an Exacto, and they just come to life.steelwoolghandi wrote:Are the wheels from the German group buy? They look sick on that car.
Better grab 'em while you can, they're on clearance for 97 cents, and this was my RS's last set.
CD you made those wheels look good I can't belive how old school Rod they look nice work man A+ in my book!
-
micro_man

- bitPlaya'
- Posts: 162
- Joined: Sat Jun 14, 2003 10:53 pm
- Location: michigan
- Contact:
-
HirotoR34

- bitPimp
- Posts: 1396
- Joined: Tue Oct 28, 2003 10:17 pm
- Location: in vdubland
- Contact:
-
crazydave
- bitPimp
- Posts: 6874
- Joined: Thu Apr 17, 2003 9:05 am
- Location: Koolsville
Thanks, I thought so too.HirotoR34 wrote:The hoodscoop is way nicer than the carb stacks!
Actually this was my third time doing that to the wheels. It was pretty routine and took about 10-15 minutes. Try to center the exacto tip in the hole. Two twist this way, then one twist that way to clear out the shavings, and the diameter of the hole is directly relative to how hard you push, not the number of turns. (I figured out the last part the hard way.Must've taken you a while to drill out the rims......sweatin the whole time I imagine.