Page 1 of 2
My Pimped out Audi TT
Posted: Tue Aug 22, 2006 5:51 pm
by Dougboy
waddup pimps

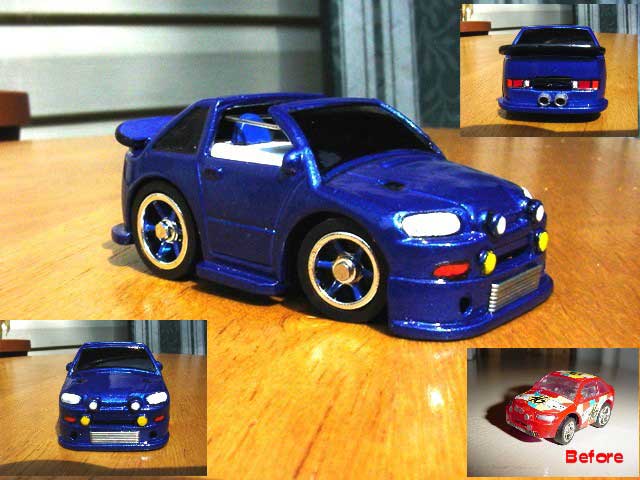
Here is my zzse Audi TT body that i just finished last night. Yes i know i did a bad job on the body kit but this is my first attempt at modifying a zz/bit body and i didnt really have the right putty
Anyways, heres the pics
cut out pieces from a card and glued them on

Puttied then painted

Final product

Posted: Tue Aug 22, 2006 6:28 pm
by hue35
You actually did a good job up until you decided to paint it. If your not going to take the time to sand out the putty and do some shaping, you may as well leave the added plastic clean and just paint it.
Decent paint, though.
Posted: Tue Aug 22, 2006 6:58 pm
by crazydave
Yep, you should've just took more time to sand before painting. Kind of a waste of a nice paint job.
You can find emery boards with the nail care stuff at your local grocery store, for less than a buck. They work great for shaping. Get some fine grit sandpaper, at least as fine as 400 grit to finish.
With just a little extra effort that could be looking clean.

Posted: Tue Aug 22, 2006 7:04 pm
by sg219
I agree with the last two Pimps.
Just a bit more time and that would have been so much nicer.
Still a very good effort.
Posted: Tue Aug 22, 2006 7:17 pm
by Dougboy
its not that im too lazy to sand and shape it. I did not have the right putty and the crap i had was kinda mushy even when dried so sanding didnt work

I will get better putty for my next body
Posted: Tue Aug 22, 2006 7:25 pm
by sg219
Dougboy wrote:its not that im too lazy to sand and shape it. I did not have the right putty and the crap i had was kinda mushy even when dried so sanding didnt work
I will get better putty for my next body
How long did you let it cure? 10 minutes?

What kind of putty did you use? Silly putty?
Don't sweat it. We're here for open and honest communication. We won't tell you its great when it sucks ass, and vise versa.
Posted: Tue Aug 22, 2006 7:46 pm
by CaboWabo
Everyone's gotta start some where.
Chalk it up to a learning experience.
Now you know not to use that kind of putty, whatever that kind was.
Posted: Tue Aug 22, 2006 7:54 pm
by Bart
yea all it take is time man. Patience is key. Im working on my first project and it's a shitload of sanding

to make it look right. I'm not sure what the other pimps are using but I'm using Tamiya Basic Type Putty and it works fine for me. Apply it but wait like at least 30-60min for it to cure. You'll know when its cured cuz it sands real easily. Well not bad for a first. The Paint job looks fine.. I hope mine turns out that well
Posted: Tue Aug 22, 2006 8:38 pm
by SuperFly
Bart wrote:I'm not sure what the other pimps are using but I'm using Tamiya Basic Type Putty and it works fine for me. Apply it but wait like at least 30-60min for it to cure.
That's what I use.
And yeah, I probably go through 3-4 rounds of adding putty, sanding and shaping, primer coat, repeat before I lay down the paint.
Posted: Tue Aug 22, 2006 8:52 pm
by DarkTari
True Dat ! Never rush a job. I work on shit for weeks when I get the time.
Here is my 1st body mod and I used no putty what's so ever. Just Super Glue and a lot of filing / sanding.
Posted: Tue Aug 22, 2006 10:46 pm
by SuperFly
DarkTari wrote:Here is my 1st body mod and I used no putty what's so ever. Just Super Glue and a lot of filing / sanding.
Don't forget the styrene or credit cards or whatever pieces you added.
Just didn't want someone going, "superglue and sandpaper? how the hell did he make that spoiler?"
Posted: Wed Aug 23, 2006 7:37 am
by BilboBaggins
I use two different putty's when working on bodies and models.
1. Green Airplane Putty that comes in a tube. Dries quickly when laid in thin coats.
2. Games Workshop Epoxy Putty (Called Green Stuff). It a strip of putty in two colors (usually yellow and blue) that have to be kneaded together to activate (hence GREEN STUFF). It has a longer work time and can be laid a little thicker for filling gaps but it takes a day (or more) to fully harden to sand. It can shapes using a blade (they sell shaping tools for it) just have to keep the tool wet or the putty will stick to it and you'll never get it right.
I've been know to putty, sand, and then prime to see my mistakes then putty and sand again. For some reason the Krylon gray primer shows all the errors to help out this little Hobbit.
I've also found when gluing to plastic pieces together some glues (Example: Games Workshop Plastic Glue) will melt the pieces of plastic together to form a bond. if you put a little too much glue down it can fill the seams and be filed/sanded smooth later. I've used this method on most of my front air dams (piling several layers of styrene on top of each other to get the height right.)
I usually use gray primer but if you are going to a brighter final color use White primer.
Posted: Wed Aug 23, 2006 8:08 am
by crazydave
BilboBaggins wrote:I've also found when gluing to plastic pieces together some glues (Example: Games Workshop Plastic Glue) will melt the pieces of plastic together to form a bond. if you put a little too much glue down it can fill the seams and be filed/sanded smooth later. I've used this method on most of my front air dams (piling several layers of styrene on top of each other to get the height right.)
That's pretty much what I do.
Just superglue, Zip Zaps packaging, and a lot of sanding, no putty here.

Posted: Wed Aug 23, 2006 4:31 pm
by betty.k
crazydave wrote:Just superglue, Zip Zaps packaging, and a lot of sanding, no putty here.
same here, i usually shape some plastic to the size and shape i want it then glue it in place. i then use superglue to fill gaps, not too much at a time or it won't set hard.
Posted: Wed Aug 23, 2006 6:18 pm
by Maxximum Attack
Thanks dave, I always thought that was putty.
I just did that. I've done so much more to a bit in the last month than I've done in my total bit tennier...dammed bits

Maxx
