
Fastlane 1/24th scale ('04 style)
-
sg219
- bitPimp
- Posts: 4245
- Joined: Thu Jan 22, 2004 1:00 pm
- Location: Kennywood, PA
- Contact:
$21 (includes tax) + postage = ?? For WAY down there, probably about $7-10, I'm sure less without the packing.ph2t wrote:pimp, if you're up for it shoot me a quote for scoring one of these buggers for a dumbarse aussie croc fucker.....
in like flynn......

ph2t.
Would you want the box/packaging or just the goodies? That would save a bit. Theres a shitload of BS packing crap. (cardboard, plastic, air, tape, severed arms)
If anyone else would like one down there, I could do a mass shipping.
Let me know.

-
sg219
- bitPimp
- Posts: 4245
- Joined: Thu Jan 22, 2004 1:00 pm
- Location: Kennywood, PA
- Contact:
Here's the stats....
@ph2t....
I weighted the truck and the TX, no stock packing or shipping box. Just over 1.5#'s So I'm figuring about 2# after a little padding is added.
Here's the numbers I get from the USPS site to ship to bettyk. You addy was buried somewhere. Close enough.
Global Express Mail™ (EMS) 3 - 5 Days $24.00
Airmail Letter Post 4 - 7 Days $14.90
Airmail Parcel Post 4 - 10 Days $18.75
Economy (Surface) Letter Post 4 - 6 Weeks $6.65
Economy (Surface) Parcel Post (Rate for pieces 5 pounds or less) 4 - 6 Weeks $21.50
-
crazydave

- bitPimp
- Posts: 6874
- Joined: Thu Apr 17, 2003 9:05 am
- Location: Koolsville
These thing rock! (For $20) 
Picked one of these up with the off road upgrade. Wasn't expecting too much, I mean heck, seems like just a few years ago that you couldn't find much more than RCs that only go forward and turn in reverse for under $20. I was surprised that it has nice smooth diffs, front and rear. They had just a little bit of pack to them. And metal locking wheel nuts, now why couldn't my Xmod or Iwaver come with metal wheel nuts?
It's fairly fast, not quite as fast as my Iwaver, but a lot faster than I would have expected. It also has enough torque to lift the front wheels off the ground, something I also hadn't expected, considering how heavy it is loaded up with batteries. It ran forever, I'm guessing over an hour and a half last night and this morning, on a set of NiMH batteries. The motor gets really hot too. These last two things make me think a more efficient PCB should really open these up. The stock tires seem a harder compound than my Iwaver's, but they got great grip, enough to lift the front wheels on the slick tile floor. The 4WD definatey gave it the ability to get over obstacles that would hang my Iwaver up.
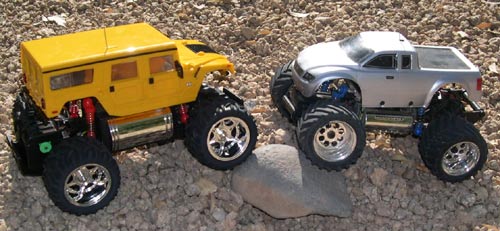
I got the off road kit with it. The shocks are quite a bit softer, but I don't think I like them, they're bit too soft. They make it seem too bouncy in the rough stuff as it starts to pogo, and they are too soft to return the car to level after makeing a hard turn, so it drives off crooked until it shifts its weight again. The Orange motor come with a Orange gear that has a 8-tooth pinion rather than the stock 10-tooth Green one. The orange motor with the Orange gear is much slower and a lot torquier. Trying the Orange motor with Green gear, the Orange motor is much quicker in the first 5-6 ft., then tops out quickly. I think I prefer the stock motor. I want to get the speed set now and try the Purple motor with the greeen and Orange gears. The tires have a more agressive tread pattern that also looks like some kind of 1/10th scale tire, though I can't quite place them. The wheels, I think are cooler than stock. The Yellow H1 looks like a school bus to me. Something must be done about that. Keep an eye out, I already got plans.
Here's a pic since I ahven't seen any pics of it w/ the off road hop up set.

... and compared to the 04. You can see its a just slightly larger scale. Bonus of that is that model car bodies can be adapted to fit more easily.
Picked one of these up with the off road upgrade. Wasn't expecting too much, I mean heck, seems like just a few years ago that you couldn't find much more than RCs that only go forward and turn in reverse for under $20. I was surprised that it has nice smooth diffs, front and rear. They had just a little bit of pack to them. And metal locking wheel nuts, now why couldn't my Xmod or Iwaver come with metal wheel nuts?
It's fairly fast, not quite as fast as my Iwaver, but a lot faster than I would have expected. It also has enough torque to lift the front wheels off the ground, something I also hadn't expected, considering how heavy it is loaded up with batteries. It ran forever, I'm guessing over an hour and a half last night and this morning, on a set of NiMH batteries. The motor gets really hot too. These last two things make me think a more efficient PCB should really open these up. The stock tires seem a harder compound than my Iwaver's, but they got great grip, enough to lift the front wheels on the slick tile floor. The 4WD definatey gave it the ability to get over obstacles that would hang my Iwaver up.
I got the off road kit with it. The shocks are quite a bit softer, but I don't think I like them, they're bit too soft. They make it seem too bouncy in the rough stuff as it starts to pogo, and they are too soft to return the car to level after makeing a hard turn, so it drives off crooked until it shifts its weight again. The Orange motor come with a Orange gear that has a 8-tooth pinion rather than the stock 10-tooth Green one. The orange motor with the Orange gear is much slower and a lot torquier. Trying the Orange motor with Green gear, the Orange motor is much quicker in the first 5-6 ft., then tops out quickly. I think I prefer the stock motor. I want to get the speed set now and try the Purple motor with the greeen and Orange gears. The tires have a more agressive tread pattern that also looks like some kind of 1/10th scale tire, though I can't quite place them. The wheels, I think are cooler than stock. The Yellow H1 looks like a school bus to me. Something must be done about that. Keep an eye out, I already got plans.
Here's a pic since I ahven't seen any pics of it w/ the off road hop up set.
... and compared to the 04. You can see its a just slightly larger scale. Bonus of that is that model car bodies can be adapted to fit more easily.
-
SuperFly

- bitPimp
- Posts: 2760
- Joined: Mon May 05, 2003 6:37 pm
- Location: nationwide
Nice Dave, same setup as me. I need to get mine outside, so far I've mainly been climbing piles of laundry.
I've been tooling on mine for a week or so. So far, I've locked the diffs with silly putty and did the LSSM mod. The LSSM mod really frees up the full range of articulation. The stock shocks only give you about 50% of the whole range of travel it's capable of. Next, I'm gonna make it propo with an iWaver board. I can't decide whether to gut my iWaver 01 or to just order a new iWaver PCB/steering pot assembly. I thought about trying to get a 6 tooth pinion on that motor, but I thought I'd see how propo speed control feels before I gear down.
I've been tooling on mine for a week or so. So far, I've locked the diffs with silly putty and did the LSSM mod. The LSSM mod really frees up the full range of articulation. The stock shocks only give you about 50% of the whole range of travel it's capable of. Next, I'm gonna make it propo with an iWaver board. I can't decide whether to gut my iWaver 01 or to just order a new iWaver PCB/steering pot assembly. I thought about trying to get a 6 tooth pinion on that motor, but I thought I'd see how propo speed control feels before I gear down.

-
crazydave
- bitPimp
- Posts: 6874
- Joined: Thu Apr 17, 2003 9:05 am
- Location: Koolsville
Watch out for loose dust. My suspension got really rough where it pivots against the chassis. I also got a pieces of sand jammed in the gears. Basically it took all the newness out of it, I wish I stuck to running over laundry a little longer.SuperFly wrote: I need to get mine outside, so far I've mainly been climbing piles of laundry.
I can't wait to get an Iwaver PCB in here, because I can't help but to try to compare it to my Iwaver, but I also can't wait to get one in a Zip Zap MT and SE or two. I wonder if Iwaver PCBs are cheaper by the case.
-
ph2t
- bitPimp
- Posts: 1979
- Joined: Tue Mar 25, 2003 6:33 am
- Location: taco city
buy one from rcmart.can't decide whether to gut my iWaver 01 or to just order a new iWaver PCB/steering pot assembly.
Your iw01 most likely has the first revision of the iwaver pcb. This version has a simple feedback controller circuit for the steering elecltronics. This results in a jittery fwd/back motion on the steering when modding it to fit 3rd party servo's n shit.
the newer iwaver pcb (as stocked on rcmart) has a better steering controller circuit that is more stable and better suited to modding with 3rd party servo's.
you can tell buy looking at the PCB. near where the steering servo and motor wires connect. if wll four wires connect near to each other, then you have the 1st iwaver pcb version. the servo pot wires on the newer version terminate on the PCB off to one side, away from the servo motor wires.
also the IC on the pcb on teh first gens is a 8 (or 10) pin SOIC chip. but the newer PCB's are a 14 (16?) pin TSSOP package. (ie: the pins are mega close together, have the space between pins as the original PCB)
makes sense? I dunno, fucken feeling shit today with a nice 'ol apenea headache coupled with my daughter discovering that she doesn't like the tunder and heavy rain that pissed down all night and proceeding to tell mommy and daddy all about it from 3am to 5am...argh.....
ph2t,
People are mean to you because you're a fucking idiot.
-
SuperFly
- bitPimp
- Posts: 2760
- Joined: Mon May 05, 2003 6:37 pm
- Location: nationwide
Thanks for the tip. Without looking I'm sure mine is first rev., I bought it as soon as they came out. Not to mention I've already had twitch problems with that pcb.
I'll probably order 2 while I'm at it. $16 is a pretty good deal with steering servo and pot.
Sorry to hear about your head. Get used to it m8.
I'll probably order 2 while I'm at it. $16 is a pretty good deal with steering servo and pot.
Sorry to hear about your head. Get used to it m8.
-
mikirgra
- bitThug
- Posts: 93
- Joined: Thu May 27, 2004 10:22 pm
- Location: nowheresville
This truck doesn't do dirt! Shame too, cuz it's pretty fun to run in the gritty, but it will totally freeze the mother up! I had to do a complete teardown/rebuild the first day I had it after running in a local park. I got red dirt all over the beast (like baseball field dirt), and it was like my truck came down with a severe case of arthritis.crazydave wrote:Watch out for loose dust. My suspension got really rough where it pivots against the chassis. I also got a pieces of sand jammed in the gears. Basically it took all the newness out of it, I wish I stuck to running over laundry a little longer.SuperFly wrote: I need to get mine outside, so far I've mainly been climbing piles of laundry.
This is my first truck, of any scale. Being a 4wd monster, I assumed I could take it for a walk on the wildside. Are all sub 1/10 vehicles dirt-phobic like the 1/24 SSMT?
-
Cheesehead
- bitPlaya'
- Posts: 116
- Joined: Wed Jan 14, 2004 8:00 pm
I wonder if it's possible to seal the whole thing up.mikirgra wrote:This truck doesn't do dirt! Shame too, cuz it's pretty fun to run in the gritty, but it will totally freeze the mother up! I had to do a complete teardown/rebuild the first day I had it after running in a local park. I got red dirt all over the beast (like baseball field dirt), and it was like my truck came down with a severe case of arthritis.crazydave wrote:Watch out for loose dust. My suspension got really rough where it pivots against the chassis. I also got a pieces of sand jammed in the gears. Basically it took all the newness out of it, I wish I stuck to running over laundry a little longer.SuperFly wrote: I need to get mine outside, so far I've mainly been climbing piles of laundry.
This is my first truck, of any scale. Being a 4wd monster, I assumed I could take it for a walk on the wildside. Are all sub 1/10 vehicles dirt-phobic like the 1/24 SSMT?
A few nylon washers, 0-rings, and a bit of hot glue would let you all but drive it underwater.
Lithiums are great!
Triple the speed...
four times the duration....
And they explode if you crash them too hard!
GWS 4 EVR
-my future car's bumper vanity plate
Triple the speed...
four times the duration....
And they explode if you crash them too hard!
GWS 4 EVR
-my future car's bumper vanity plate
-
crazydave
- bitPimp
- Posts: 6874
- Joined: Thu Apr 17, 2003 9:05 am
- Location: Koolsville
I hear ya. just went outside for a minute, and I had to give it a good cleaning to get it working again. Sucks really, I wish i hadn't done that.mikirgra wrote:This truck doesn't do dirt! Shame too, cuz it's pretty fun to run in the gritty, but it will totally freeze the mother up! I had to do a complete teardown/rebuild the first day I had it after running in a local park. I got red dirt all over the beast (like baseball field dirt), and it was like my truck came down with a severe case of arthritis.crazydave wrote:Watch out for loose dust. My suspension got really rough where it pivots against the chassis. I also got a pieces of sand jammed in the gears. Basically it took all the newness out of it, I wish I stuck to running over laundry a little longer.SuperFly wrote: I need to get mine outside, so far I've mainly been climbing piles of laundry.
Even 1/10th scale cars are vulnerable to dirt. They're just easier to break down and clean. Toy store cars seem to be designed so they can not be broken down. Even still, it used to take me 4-6 hours to completely break down and clean my Stampede, which I did every 10-15 runs. I cleaned the motor every 3 runs, and had to spray out the the wheel bearings every 5-6 runs. With about 5 minute runtimes, you get an idea of how often I was cleaning as opposed to running.This is my first truck, of any scale. Being a 4wd monster, I assumed I could take it for a walk on the wildside. Are all sub 1/10 vehicles dirt-phobic like the 1/24 SSMT?
So any RC that runs in the dirt needs to be maintained, but these cars don't do well in the dirt because there is a lot of plastic rubbing on plastic in the suspension.
An easy way to make an indoor offroad track is if you have a fairly large throw rug, you can shove objects under it to climb and jump. We got a 5'x8' rug I've been having fun with
-
SuperFly
- bitPimp
- Posts: 2760
- Joined: Mon May 05, 2003 6:37 pm
- Location: nationwide
Here's a quick little run-down on doing the LSSM shock mod for the FastLane SuperSlick 1:24 Monster Truck. You'll have to excuse my shitty pictures, I'm just really busy right now and didn't have time to set it up properly. You can find a tutorial for this mod at http://mini-zracer.com/gallery/album231 , but I learned a couple things on the way worth sharing.
This mod costs about $10 for parts that can be found at most hobby stores. While the Mini-ZRacer.com tutorial talks about rubber tubing, I think styrene is the way to go. Much less friction, easier to find correct size, etc.
Here's what you need:

to make this:

The one part you will need that you can see in the picture of the shock that's not in the parts picture is small rubber O-rings. You can get these at a good hardware store. As far as sizing goes, the best thing to do is to take the parts with you and test-fit them in the store. The metal rods are linkage rods for R/C airplanes, and the size on those is 2-56, 12" long. A pack of 5 cost me $3.20. The larger styrene tube needs to just slip over the top part of the shock as a means of pushing the spring lower. This larger styrene tubing basically is a spacer that is taking the place of 3 rubber O-rings. Then the one rubber O-ring I have on there holds the spacer in place. This has the effect of raising the overall ride height, which you can see in a picture below.
First of all, you'll need to disassemble the stock shock. I would use the black stock ones rather than the red climbing kit ones, simply because they have stiffer springs and will work better with the added action they will be getting.
Pull the shock off the truck. Then move the spring out of the way and cut the post as close to the top end as you can. You want to leave as much of the bottom part of the post as you can because you're going to chuck that into a drill or dremel tool. I found the stock posts kind of difficult to remove. The reason for putting it in a drill is spinning it inside the plastic will heat it up enough to allow it to come out easier. You don't want to damage the little cups that hold it on or it will be useless. The stock posts are anchored into the plastic, so they don't unscrew. Kinda like getting bit wheels off of axles, ya just gotta pull like crazy and not damage stuff.
Once you get the stock post out, you should then have two black plastic shock parts (the top and the bottom), and the spring.
Take one of the linkage rods and cut the threaded end so there's about 3/16" of threads left. This should be plenty to thread it into the lower shock housing. You want to be careful about dinging up the rod, as any scratches you put in it will cause it to travel less freely. I actually put mine in my dremel and polished them like I do my Mini-Z kingpins. That's it for the lower housing. You'll need to cut the top off as well, and I'll have to put the exact length in here later as I don't have it in front of me. Basically you want it long enough that it won't slip through the top of the shock at the extreme range of articulation.
As for the top, all you need to do is create the styrene tube spacer with the rubber O-ring to hold it in place, and the smaller styrene tube is just an insert to take up slop in the top part. The spacer should be around 1/8" to 3/16", basically as tall as you can make it and still have enough room on the top part of the shock for an O-ring to grip.
The guage of the small styrene tube needs to be small enough to fit inside the inner part of the shock top. Then you ream it out with a 3/32" drill bit (by hand), and give a few wraps of a thin strip of tape around the outside to give it a snug fit. This piece serves the purpose of keeping the shock post travelling on a straight path, but it also seems to provide a little dampening.
Here you can see the raised overall height:

And here you can see what you get and how it works:


This mod costs about $10 for parts that can be found at most hobby stores. While the Mini-ZRacer.com tutorial talks about rubber tubing, I think styrene is the way to go. Much less friction, easier to find correct size, etc.
Here's what you need:
to make this:
The one part you will need that you can see in the picture of the shock that's not in the parts picture is small rubber O-rings. You can get these at a good hardware store. As far as sizing goes, the best thing to do is to take the parts with you and test-fit them in the store. The metal rods are linkage rods for R/C airplanes, and the size on those is 2-56, 12" long. A pack of 5 cost me $3.20. The larger styrene tube needs to just slip over the top part of the shock as a means of pushing the spring lower. This larger styrene tubing basically is a spacer that is taking the place of 3 rubber O-rings. Then the one rubber O-ring I have on there holds the spacer in place. This has the effect of raising the overall ride height, which you can see in a picture below.
First of all, you'll need to disassemble the stock shock. I would use the black stock ones rather than the red climbing kit ones, simply because they have stiffer springs and will work better with the added action they will be getting.
Pull the shock off the truck. Then move the spring out of the way and cut the post as close to the top end as you can. You want to leave as much of the bottom part of the post as you can because you're going to chuck that into a drill or dremel tool. I found the stock posts kind of difficult to remove. The reason for putting it in a drill is spinning it inside the plastic will heat it up enough to allow it to come out easier. You don't want to damage the little cups that hold it on or it will be useless. The stock posts are anchored into the plastic, so they don't unscrew. Kinda like getting bit wheels off of axles, ya just gotta pull like crazy and not damage stuff.
Once you get the stock post out, you should then have two black plastic shock parts (the top and the bottom), and the spring.
Take one of the linkage rods and cut the threaded end so there's about 3/16" of threads left. This should be plenty to thread it into the lower shock housing. You want to be careful about dinging up the rod, as any scratches you put in it will cause it to travel less freely. I actually put mine in my dremel and polished them like I do my Mini-Z kingpins. That's it for the lower housing. You'll need to cut the top off as well, and I'll have to put the exact length in here later as I don't have it in front of me. Basically you want it long enough that it won't slip through the top of the shock at the extreme range of articulation.
As for the top, all you need to do is create the styrene tube spacer with the rubber O-ring to hold it in place, and the smaller styrene tube is just an insert to take up slop in the top part. The spacer should be around 1/8" to 3/16", basically as tall as you can make it and still have enough room on the top part of the shock for an O-ring to grip.
The guage of the small styrene tube needs to be small enough to fit inside the inner part of the shock top. Then you ream it out with a 3/32" drill bit (by hand), and give a few wraps of a thin strip of tape around the outside to give it a snug fit. This piece serves the purpose of keeping the shock post travelling on a straight path, but it also seems to provide a little dampening.
Here you can see the raised overall height:
And here you can see what you get and how it works:
-
Sporttracguy

- bitNinja
- Posts: 507
- Joined: Thu May 12, 2005 4:25 pm
- Location: Seattle, Washington USA
Picked one of these up today, great deal for what you get. That motor area looks like with some slight modification you can fit an orion big block (mini t motor) in there in combination with some new electronics of course.
Id like to put an iwaver pcb in there but i dont have an iwaver remote, will it work with an overland remote?
STG
Id like to put an iwaver pcb in there but i dont have an iwaver remote, will it work with an overland remote?
STG
-
Cheesehead
- bitPlaya'
- Posts: 116
- Joined: Wed Jan 14, 2004 8:00 pm
-
sg219
- bitPimp
- Posts: 4245
- Joined: Thu Jan 22, 2004 1:00 pm
- Location: Kennywood, PA
- Contact:
I'm in the process of putting in an '04 board with a stock Mini-T servo and possibly either go with a couple of small lipo's that I have collecting dust, or 6 cells. Then gotta resolder the servo wires to the board in the correct spots and decide on which batteries I want to use. Maybe a motor swap too.
Bird's thinking about an Associated RX, a Spy ESC, Hitec 81 servo, Mini-t motor of some kind.
The possibilites with this truck is almost limitless.
I really only see one limit..........The dog bones.
I'm thinkin' the Xmod EVO GPM dog bones might fit.
Bird's thinking about an Associated RX, a Spy ESC, Hitec 81 servo, Mini-t motor of some kind.
The possibilites with this truck is almost limitless.
I really only see one limit..........The dog bones.
I'm thinkin' the Xmod EVO GPM dog bones might fit.
-
crazydave
- bitPimp
- Posts: 6874
- Joined: Thu Apr 17, 2003 9:05 am
- Location: Koolsville
Yeah, I don't know how much torque these are gonna take. I'm just curious how much fun its gonna be with an Iwaver PCB.
I broke the steering tonight, it was an easy fix, I just undid the four screws on top, and the steering popped back into place, but I got a peek inside. It uses a pot to center the steering like a servo, I'm wondering if its a direct swap, or if I'm gonna have to rig the Iwaver pot in there somehow. It also has a big fat steering motor, I'm wondering if its gonna have better steering than my 04.
Thanks for posting that mod Superfly. Do they sell those Du-Bro links like at a LHS, or a hardware store? Meantime, the shocks on the 1/43rd Super Slicks MT are about 1/4" longer, with springs about as soft as the ones in the off road set. The bottom is ball end and snaps right on, the top is screw on, and I'm gonnna have to shim it, or try to yank it off to work. It was binding when I tried to just screw them on.