
Had a breakthrough with airbrush
-
crazydave

- bitPimp
- Posts: 6874
- Joined: Thu Apr 17, 2003 9:05 am
- Location: Koolsville
Had a breakthrough with airbrush
So here was my problem. Initiallially I could only get about 1/4" lines, but when I went to work on a Lexan body, the airpressure pushed the paint around. So I tried less airpressure, thinner paints, nothing worked, it just got worse, and it became overwhelming for me when trying to deal with it on the smaller Micro-T bodies.
I was absolutely convinced my airbrush was defective, and was right about to buy a new one. When I went searching for answers before I dropped more money into it. I came across this troubleshooting article, and the first thing he said was beginners tend to want to blame the airbrush. Doh! That's me. So I'm a beginner, that put me in my place.
A big part of my problem was air leaking in the head assembly. I had used teflon tape on all my hose fittings to make sure air got to the airbrush, but I figured as long as there was air blowing across the tip, it should work. Not so, all the air has to flow the same direction to create the vacuum. If any air is leaking out, it creates back pressure. So sealed I the head assembly up real good with the teflon tape, and that got it working at least like new again, but I still couldn't get the fine lines that were advertised when I bought it. So I read some more. That's when I learned how important air pressure is. This is confusing, I don't know why no one else explains it this way. See my manual says my airbrush operates at 15 to 50psi, 30psi is normal, but everyone says they run theirs at 12psi. It turns out you can't just set it at a specific pressure an expect it to work. You have to tune the airpressure to the paint mixture, like you tune a guitar. You open up the airbrush, and slowly turn the pressure up just until the paint starts to flow evenly. The guy in the article says usually the pressure is so low it doesn't even register on the meter. Sure enough with my thinned paints it didn't even register. So I tried the Parma paint straight from the bottle, since it should be airbrush ready, and they end up in the 8-10 psi range, it varies with the color. So I was thinning the hell out of my paints, when I was just using way too much pressure. However if you want to get pencil thin lines, you have to use almost watery paints with almost no pressure.
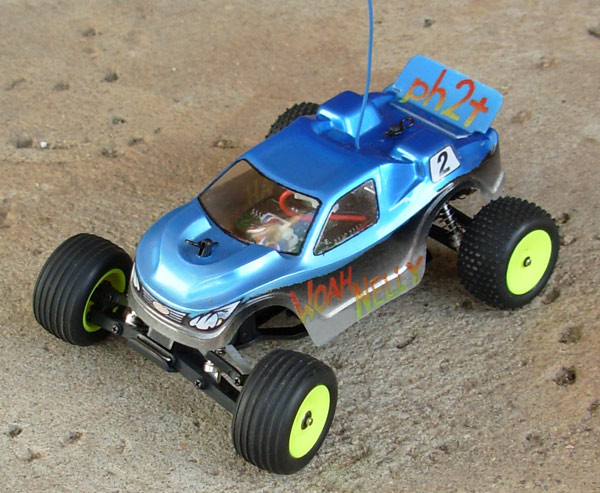
Here's my first try on a body. The black came down way to far, and I didn't have enough control to get the red in the letters right.
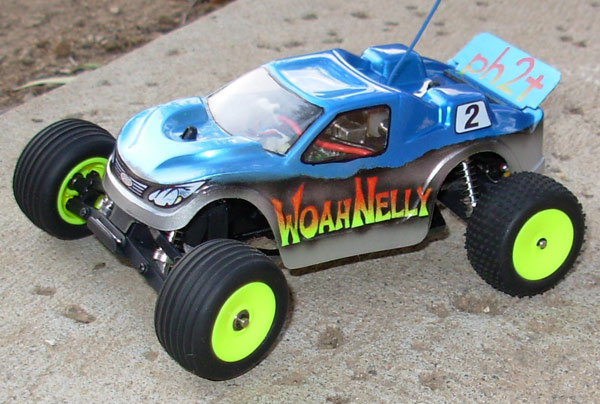
Now here's the improved one, not sure it looks better, but it looks as I intended it to. I had fine enough control I was even able to put shadows behind the letters.
The deal with adjusting the airpressure to the paint was a breakthrough for me. Like seeing the light for the first time. Nothing like that is mentioned in my manual, and I've read three different airbrush books that never mention that. I got the impression the airbrush had to be set at a minimum of 12psi, and you mix the paint to that pressure, but the reality is the opposite. I think that's important, I don't see how you can write a book and not mention that. So I figured this info should help someone.
I was absolutely convinced my airbrush was defective, and was right about to buy a new one. When I went searching for answers before I dropped more money into it. I came across this troubleshooting article, and the first thing he said was beginners tend to want to blame the airbrush. Doh! That's me. So I'm a beginner, that put me in my place.
A big part of my problem was air leaking in the head assembly. I had used teflon tape on all my hose fittings to make sure air got to the airbrush, but I figured as long as there was air blowing across the tip, it should work. Not so, all the air has to flow the same direction to create the vacuum. If any air is leaking out, it creates back pressure. So sealed I the head assembly up real good with the teflon tape, and that got it working at least like new again, but I still couldn't get the fine lines that were advertised when I bought it. So I read some more. That's when I learned how important air pressure is. This is confusing, I don't know why no one else explains it this way. See my manual says my airbrush operates at 15 to 50psi, 30psi is normal, but everyone says they run theirs at 12psi. It turns out you can't just set it at a specific pressure an expect it to work. You have to tune the airpressure to the paint mixture, like you tune a guitar. You open up the airbrush, and slowly turn the pressure up just until the paint starts to flow evenly. The guy in the article says usually the pressure is so low it doesn't even register on the meter. Sure enough with my thinned paints it didn't even register. So I tried the Parma paint straight from the bottle, since it should be airbrush ready, and they end up in the 8-10 psi range, it varies with the color. So I was thinning the hell out of my paints, when I was just using way too much pressure. However if you want to get pencil thin lines, you have to use almost watery paints with almost no pressure.
Here's my first try on a body. The black came down way to far, and I didn't have enough control to get the red in the letters right.
Now here's the improved one, not sure it looks better, but it looks as I intended it to. I had fine enough control I was even able to put shadows behind the letters.
The deal with adjusting the airpressure to the paint was a breakthrough for me. Like seeing the light for the first time. Nothing like that is mentioned in my manual, and I've read three different airbrush books that never mention that. I got the impression the airbrush had to be set at a minimum of 12psi, and you mix the paint to that pressure, but the reality is the opposite. I think that's important, I don't see how you can write a book and not mention that. So I figured this info should help someone.
-
sg219
- bitPimp
- Posts: 4244
- Joined: Thu Jan 22, 2004 1:00 pm
- Location: Kennywood, PA
- Contact:

-
SHAUN
- bitDisciple
- Posts: 1462
- Joined: Wed Oct 05, 2005 10:35 am
- Location: On the trail
- Contact:
-
crazydave
- bitPimp
- Posts: 6874
- Joined: Thu Apr 17, 2003 9:05 am
- Location: Koolsville
-
SHAUN
- bitDisciple
- Posts: 1462
- Joined: Wed Oct 05, 2005 10:35 am
- Location: On the trail
- Contact:
-
Maxximum Attack
- bitDisciple
- Posts: 1798
- Joined: Thu Jul 31, 2003 7:15 pm
- Location: Barbados
-
crazydave
- bitPimp
- Posts: 6874
- Joined: Thu Apr 17, 2003 9:05 am
- Location: Koolsville
Two things about using the window decals as mask, for one decals are too sticky. They sometimes leave residual gooies, not something you want to be dealing with around fresh paint. Secondly, the window decals do not exactly fit the window lines marked in the body, few do, since they also have frames.SHAUN wrote:How sticky are the window decals would it be possible to put them on the inside of the body? and use them as a mask?
Cutting window mask is easy. Stick your masking tape to the outside of the body. Rub the tape into the window crevise with your finger nail, or a toothpick. Then trace the window with a ballpoint pen. The indentation should guide your tip. Pull the tape off and transfer it to glass. (If your body has overspray film, becareful not to pull it off with the tape.) Cut the mask out, then transfer it to the inside of the body, keeping in mind the side windows will now go on the opposite side of the body, because everything is mirrored when working from the inside.
-
Maxximum Attack
- bitDisciple
- Posts: 1798
- Joined: Thu Jul 31, 2003 7:15 pm
- Location: Barbados
I find that the goo just rolls off when rubbed with the finger 
Also what you can do is use window masks *and* the window decal on the inside of the body. Just apply the window mask, then the window decal over it. When done painting you can remove the decal and paint the space left between the window mask and the paint line (because the window decal is usually bigger than the mask). Paint this space black then remove the window mask.
Then you will have crystal clear windows when you remove the overspray film. And not the cloudy decaled windows.
NB: The black is used to paint the window frame, in case you couldn't imagine it

-
crazydave
- bitPimp
- Posts: 6874
- Joined: Thu Apr 17, 2003 9:05 am
- Location: Koolsville
I don't like that, it just gets yucky.Maxximum Attack wrote:I find that the goo just rolls off when rubbed with the finger
That's a really good idea, but you'd have to be really careful peeling the decal off, its a lot stickier than masking tape, and would really want to pull the mask with it.Also what you can do is use window masks *and* the window decal on the inside of the body. Just apply the window mask, then the window decal over it. When done painting you can remove the decal and paint the space left between the window mask and the paint line (because the window decal is usually bigger than the mask). Paint this space black then remove the window mask.
Then you will have crystal clear windows when you remove the overspray film. And not the cloudy decaled windows.
NB: The black is used to paint the window frame, in case you couldn't imagine it
For me I really think its best if I stick with the "proper tool for the job" rule. If I have issues, I get frustrated, then my issues compound, and I don't need that.
-
Maxximum Attack
- bitDisciple
- Posts: 1798
- Joined: Thu Jul 31, 2003 7:15 pm
- Location: Barbados
All I do is pull slowly and when I get to the window mask, I use my fingernail, or something similar, and peel it awat from the decal. As long as the mask is stuck, and it's edge separated from the decal, the decal will peel right off leaving the window mask behind.crazydave wrote:That's a really good idea, but you'd have to be really careful peeling the decal off, its a lot stickier than masking tape, and would really want to pull the mask with it.
-
Clint

- bitPimp
- Posts: 519
- Joined: Sun Jul 06, 2003 7:20 am
- Location: Albany, NY
- Contact: