
project Heavy Chevy (finished)
-
Maxximum Attack
- bitDisciple
- Posts: 1798
- Joined: Thu Jul 31, 2003 7:15 pm
- Location: Barbados

-
ibjamn

- bitDisciple
- Posts: 1057
- Joined: Thu Mar 30, 2006 9:09 pm
- Location: right here, waiting
Thanks for the tips.
you might not of noticed, but on the my vanquish and cal-looker, I used that method that tip was about.
The hard part on the cal-looker was the rear window curve was hard to form.
I actually used the plastic from a zip package to do both. Also, on the rear widow, there was too big a gap from the edges' thickness, so I cut it to sit flush (well, more flush anyway) in the opening. And I used elmer's glue to keep it in place.
On this windshield, not only does it have a gradual curve in it, but tighter curves on the sides. It's just going to take some time patience is all
Hey DT, how clear is that glue when it dries? The elmers method left a cloudy look to it. But anybody that knows old 1:1 VW glass, knows that they cloud around the edges over time anyway, so it gives it that scale look

sorry DT, I am an idiot. I didn't fully read the info on that link....
you might not of noticed, but on the my vanquish and cal-looker, I used that method that tip was about.
The hard part on the cal-looker was the rear window curve was hard to form.
I actually used the plastic from a zip package to do both. Also, on the rear widow, there was too big a gap from the edges' thickness, so I cut it to sit flush (well, more flush anyway) in the opening. And I used elmer's glue to keep it in place.
On this windshield, not only does it have a gradual curve in it, but tighter curves on the sides. It's just going to take some time patience is all
Hey DT, how clear is that glue when it dries? The elmers method left a cloudy look to it. But anybody that knows old 1:1 VW glass, knows that they cloud around the edges over time anyway, so it gives it that scale look
sorry DT, I am an idiot. I didn't fully read the info on that link....
Cement dries crystal clear and won't attack plastic.
-
)3utthead

- bitThug
- Posts: 51
- Joined: Sat Jul 15, 2006 7:17 pm
man its been a while since i posted here well it looks like its going along good i cant wait to see it finished
check out my gallery
-
Wesley

- bitPlaya'
- Posts: 133
- Joined: Fri Mar 09, 2007 3:43 pm
- Location: Bradford, UK
wow.. sweet fabrication! and id go with the two slot setup you suggested.. personally, i like the low-rider however heh.. the competitions gonna be 'mater juice hehe.. [ok, ok.. no more crappy jokes...]
had chance to give it a full test yet? i reckon it'll be a smooth lil runner
Btw, i took note of what you did with those buttons, its really quite inventive.. i like it ill try it on my project del sol when i fand a suitable shell for it.. wana see? http://bitpimps.lixlink.com/pages/phpFo ... php?t=9039
Edit: for more traction, i used to use a mm of foam in small tightly space blocked on the inside of the rear wheels... sometimes it worked, others it didnt, but its worth a try i reckon..
and for charging, have you tried making a stand alone charger? these offer a better charge and are really quite handy..
heres a tutorial...
http://www.tinyrc.com/qfm/racing/mod_06.htm#22
hope it works
- Wes.
had chance to give it a full test yet? i reckon it'll be a smooth lil runner
Btw, i took note of what you did with those buttons, its really quite inventive.. i like it
Edit: for more traction, i used to use a mm of foam in small tightly space blocked on the inside of the rear wheels... sometimes it worked, others it didnt, but its worth a try i reckon..
and for charging, have you tried making a stand alone charger? these offer a better charge and are really quite handy..
heres a tutorial...
http://www.tinyrc.com/qfm/racing/mod_06.htm#22
hope it works
- Wes.

-
ibjamn
- bitDisciple
- Posts: 1057
- Joined: Thu Mar 30, 2006 9:09 pm
- Location: right here, waiting
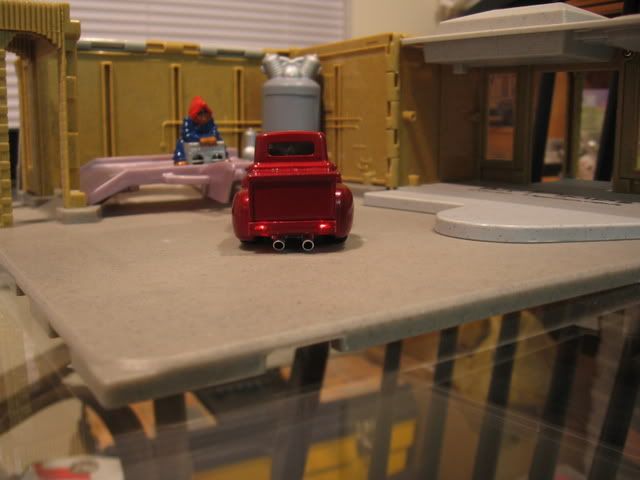
Minor update;
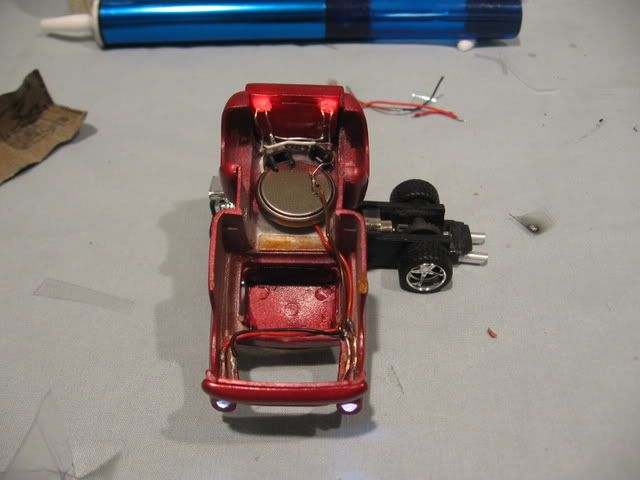
Windows are in. What a PITA it was. Lights are in position. Chassis is completed(all the misc. stuff )
Next up; tint the windows, exhaust pipes (gotta find the right rods), and wire the lights up. Almost done
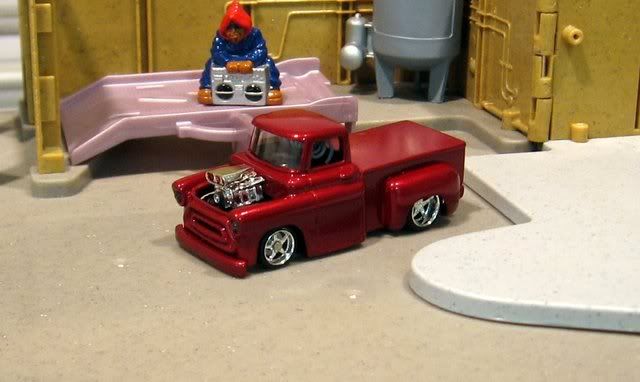
It really isn't that red, it's actually darker than that. When I'm done, I'll take final pics outside. This paint does look better in the sun.
Windows are in. What a PITA it was. Lights are in position. Chassis is completed(all the misc. stuff
Next up; tint the windows, exhaust pipes (gotta find the right rods), and wire the lights up. Almost done
It really isn't that red, it's actually darker than that. When I'm done, I'll take final pics outside. This paint does look better in the sun.
-
steelwoolghandi

- bitPimp
- Posts: 1696
- Joined: Fri Jun 11, 2004 11:53 am
- Location: RIGHT BEHIND YOU!!
- Contact:
-
ynad

- bitNinja
- Posts: 776
- Joined: Fri Apr 30, 2004 12:22 am
- Location: NYC/NJ
-
redrustbucket

- bitGangsta'
- Posts: 363
- Joined: Wed Mar 15, 2006 9:41 pm
- Location: sunny acres, fl
-
ibjamn
- bitDisciple
- Posts: 1057
- Joined: Thu Mar 30, 2006 9:09 pm
- Location: right here, waiting
Thanks guys. Check out the Floss Dem Zaust ~~~~{{
thread.
I was trying to make muffler tips in the shape of a chevy emblem..... but I settled for a simpler design.
thread.
I was trying to make muffler tips in the shape of a chevy emblem..... but I settled for a simpler design.
-
ibjamn
- bitDisciple
- Posts: 1057
- Joined: Thu Mar 30, 2006 9:09 pm
- Location: right here, waiting
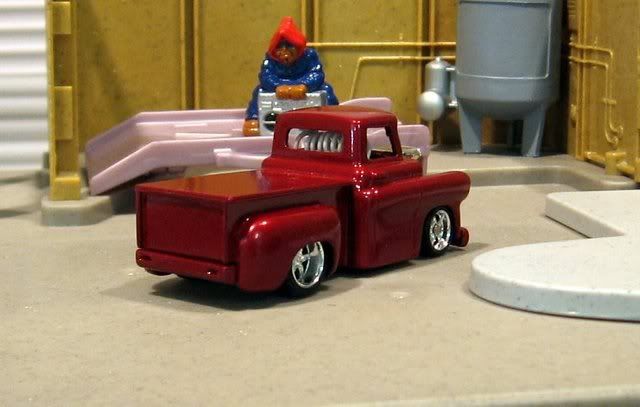
Mufflers; done.
Tint; done.


Lights; done.
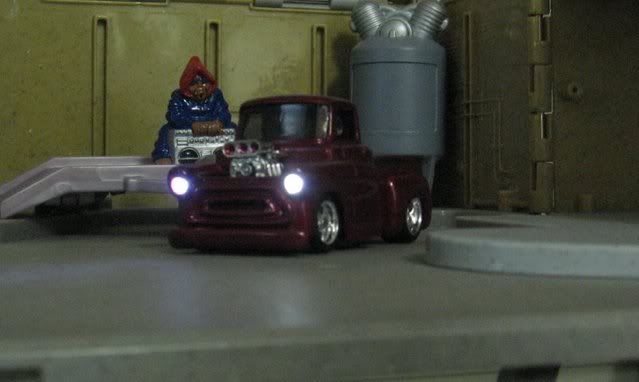

The rear lights didn't come out like I wanted. But oh well, I'm not about to repaint the bumper black, and start all over.
I ended up using a 3v watch battery. I wired the headlights (off of 2 Maters) parallel, paralleled the rear lights also(off of an ZZSE, I think), but used a single resistor inline to the negative side off them to drop the voltage to about 1.7volts.
The whole bumper doesn't light up like that in actuality, only the "frenched in" spots. The camera picked up all the light that was possible.
All that's left, is taking some pics outside in the daylight.
It rained all day here, so hopefully I can do those tomorrow.
Sorry about the low quality shots. I've had this camara for a while, and still can't figure out the manaul settings for low light.
Edit; a better pic of the rear lights
Tint; done.
Lights; done.
The rear lights didn't come out like I wanted. But oh well, I'm not about to repaint the bumper black, and start all over.
I ended up using a 3v watch battery. I wired the headlights (off of 2 Maters) parallel, paralleled the rear lights also(off of an ZZSE, I think), but used a single resistor inline to the negative side off them to drop the voltage to about 1.7volts.
The whole bumper doesn't light up like that in actuality, only the "frenched in" spots. The camera picked up all the light that was possible.
All that's left, is taking some pics outside in the daylight.
It rained all day here, so hopefully I can do those tomorrow.
Sorry about the low quality shots. I've had this camara for a while, and still can't figure out the manaul settings for low light.
Edit; a better pic of the rear lights
-
ynad
- bitNinja
- Posts: 776
- Joined: Fri Apr 30, 2004 12:22 am
- Location: NYC/NJ
Icing on the cake
About your camera: try to set white balance at low light. take a white piece of paper and place it by the object you about to shoot. Then set the white balance (no flash). same can be done with use of flash (when shooting close-ups set flash brightness to min).
This might do the trick.
About your camera: try to set white balance at low light. take a white piece of paper and place it by the object you about to shoot. Then set the white balance (no flash). same can be done with use of flash (when shooting close-ups set flash brightness to min).
This might do the trick.
-
frizzen
- bitDisciple
- Posts: 1730
- Joined: Wed Aug 03, 2005 7:48 am
- Location: Big Left Turn, Indiana
- Contact:
As Mater would say, "Dang, I's lookin' good!!!"
I would suggest painting the inside of the bumper black for that light leak. Or maybe just some outside pics.
That looks amazing man!
I would suggest painting the inside of the bumper black for that light leak. Or maybe just some outside pics.
That looks amazing man!
Jack of all trades, master of none; yet often better than master of one.
-
End genital mutilation, don't circumcise. Restore your fore'
-
End genital mutilation, don't circumcise. Restore your fore'
-
sidewinder
- bitProphet
- Posts: 3165
- Joined: Wed Apr 25, 2007 6:31 pm
- Location: Walmart

-
crazydave

- bitPimp
- Posts: 6874
- Joined: Thu Apr 17, 2003 9:05 am
- Location: Koolsville