
My first table top truck...
-
civicsr2cool

- bitNinja
- Posts: 521
- Joined: Tue Mar 29, 2005 10:01 pm
- Location: Sagnasty, MI
- Contact:

-
Sporttracguy

- bitNinja
- Posts: 507
- Joined: Thu May 12, 2005 4:25 pm
- Location: Seattle, Washington USA
-
Cheesehead
- bitPlaya'
- Posts: 116
- Joined: Wed Jan 14, 2004 8:00 pm
Sweet job, man.
Homefly.com carries bearings that would work great for that for about 6$. You can also get them from a guy in France for 2$, but the shipping is likely to be murder.
Homefly.com carries bearings that would work great for that for about 6$. You can also get them from a guy in France for 2$, but the shipping is likely to be murder.
Lithiums are great!
Triple the speed...
four times the duration....
And they explode if you crash them too hard!
GWS 4 EVR
-my future car's bumper vanity plate
Triple the speed...
four times the duration....
And they explode if you crash them too hard!
GWS 4 EVR
-my future car's bumper vanity plate
-
Sporttracguy
- bitNinja
- Posts: 507
- Joined: Thu May 12, 2005 4:25 pm
- Location: Seattle, Washington USA
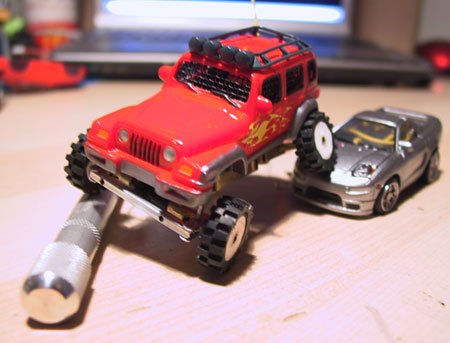
Got her up and running!  I just finished painting and installing the window mesh and the fenders. Now all i need to do is get the roof lights working and she will be done.
The 4 wheel drive is amazing, its crazy what a geared down 4 wheeler can climb over with this full suspension.
The steering doesnt turn as much as i would like, does anyone know how to make the steering motor turn more?
Anyways, i figured it was time for an update
STG
The 4 wheel drive is amazing, its crazy what a geared down 4 wheeler can climb over with this full suspension.
The steering doesnt turn as much as i would like, does anyone know how to make the steering motor turn more?
Anyways, i figured it was time for an update
STG

-
civicsr2cool
- bitNinja
- Posts: 521
- Joined: Tue Mar 29, 2005 10:01 pm
- Location: Sagnasty, MI
- Contact:
-
betty.k

- bitPimp
- Posts: 4090
- Joined: Fri Dec 26, 2003 4:52 pm
- Location: la la land
- Contact:

-
Sporttracguy
- bitNinja
- Posts: 507
- Joined: Thu May 12, 2005 4:25 pm
- Location: Seattle, Washington USA
-
Nasphere
- bitNinja
- Posts: 525
- Joined: Wed Jan 05, 2005 11:24 am
- Location: SoCal
- Contact:
I'll get right on it!Sporttracguy wrote:The steering doesnt turn as much as i would like, does anyone know how to make the steering motor turn more?
EDIT: Ok buddy, I think I got it...
By use of extra resistors we can "trick" the steering into thinking it's not turning as far as it really is...
The steering pot is a 10k. Now let's say the potential difference is 1.5V respectively at nutral. Fully locked in one direction is 1.2V. And the other direction is 1.8V. By adding extra resistors to the ends of the pot, we can make the steering travel farther to reach it's potential goal.
Let's say you add 3k resistors to either side. It totals up to 16k. Not sure if it makes a difference but you would want that to be 10k again. Using the equasion 1/(1/R1+1/R2)=10k... R1 is 16k, so that would make R2 about 30k.
Basically add a 3k resisor between the green wire and the PCB, and same for the yellow wire, then bridge a 30k resistor between those wires on the PCB.
Whack!

-
Clint

- bitPimp
- Posts: 519
- Joined: Sun Jul 06, 2003 7:20 am
- Location: Albany, NY
- Contact:
-
Sporttracguy
- bitNinja
- Posts: 507
- Joined: Thu May 12, 2005 4:25 pm
- Location: Seattle, Washington USA
-
Nasphere
- bitNinja
- Posts: 525
- Joined: Wed Jan 05, 2005 11:24 am
- Location: SoCal
- Contact:
Good to hear it!Sporttracguy wrote:Nasphere- Thanks a ton, that fixed it right up. I ended up using two 3.3 k resistors for the green and yellow. I bridged the two but it turned out to be too much so i removed that. Steering is perfect now!
You've got an awesome truck there dude! I'm with all the rest on this one, vids n pics!
Whack!
-
ynad

- bitNinja
- Posts: 776
- Joined: Fri Apr 30, 2004 12:22 am
- Location: NYC/NJ