
Micro buggy started...
-
Sporttracguy

- bitNinja
- Posts: 507
- Joined: Thu May 12, 2005 4:25 pm
- Location: Seattle, Washington USA
Micro buggy started...
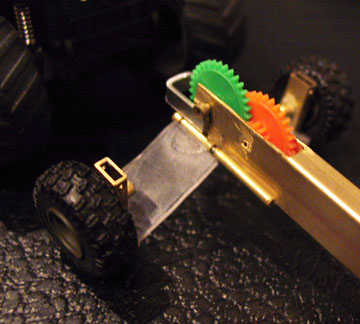
Ok pimps, ive been thinking about doing a micro buggy for some time now. Last night i had some free time to start working on a prototype. The goal is to keep it under the size of a zzmt with a full suspension, zzse electronics...stuff like that. It may not look like much yet but here is what i finished last night. Oh, and if anyone is curious, the wheels and tires are from a $1.49 wallmart special ATV, they are rubber and have awsome grip. The rims extended inside the tires to make them hard and stiff but i removed the rim and ground it down to give the tires some room to flex, worked quite well. I then had to glue the tires to the rim.
Im working on the end of a brass rod, when i finish ill cut it short and mount it to a plastic frame that im working on.
STG
Im working on the end of a brass rod, when i finish ill cut it short and mount it to a plastic frame that im working on.
STG
-
Zenith

- bitGangsta'
- Posts: 455
- Joined: Sun Jun 19, 2005 10:15 pm
- Contact:

-
steelwoolghandi

- bitPimp
- Posts: 1696
- Joined: Fri Jun 11, 2004 11:53 am
- Location: RIGHT BEHIND YOU!!
- Contact:
-
Sporttracguy
- bitNinja
- Posts: 507
- Joined: Thu May 12, 2005 4:25 pm
- Location: Seattle, Washington USA
Yeah, its about 1:64th scale,, maybe a little bigger just because most buggies tend to be smaller in real life 
Yeah, i can write something up but quite honestly, a high quality super glue holds just as well as solder and its cleaner and easier to work with. You will have to go over your work with a few layers, roughen up all the materials to be mated together and I would suggenst to get a super glue with a brush in the bottle. You also need to be sure when you adhere two pieces together that they fit correctly, if there are gaps and poor fittings then the super glue will not hold up...Thats where alot of the detailed work comes in.
STG
-
Clint

- bitPimp
- Posts: 519
- Joined: Sun Jul 06, 2003 7:20 am
- Location: Albany, NY
- Contact:
-
HACHI-RYOKU

- bitPimp
- Posts: 714
- Joined: Wed Nov 05, 2003 3:40 am
- Location: Virginia Beach, Virginia
-
Sporttracguy
- bitNinja
- Posts: 507
- Joined: Thu May 12, 2005 4:25 pm
- Location: Seattle, Washington USA
A side note on those tires. Today i went to walmart to pick up a set of chrome rims to replace the green ones i had before. Turns out those exact same tires come in different hardnesses (not sure if there is a way to tell if you dont open the box and try them out) The tires that came on the chrome rims were hard as a rock  and even the inside of the rim was structured differently...so i would be willing to guess that the army colored atv has the softer tires but dont quote me on it...its sort of a crap shoot..anyways, to make a long story short, i just switched the origional tires and put the new rims on...just a heads up for anyone that may want to give those tires a try
STG
STG
-
Sporttracguy
- bitNinja
- Posts: 507
- Joined: Thu May 12, 2005 4:25 pm
- Location: Seattle, Washington USA
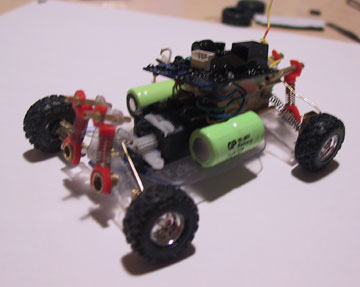
Ok guys, here is a bit of an update. I installed the shocks, drivelines, motor (with red ss pinion gear for more speed) , chrome wheels and the gear cover. THe extending shock mounts will also be mounts for the rear buggy wing.
For those drive shafts, i got tired of making U joints and since this is only rear wheel drive i discovered a different way ot doing things. I searched far and wide for the perfect springs(hardwear stores, hobby stores, junk droors...) but i just couldnt find a spring that would work for my purpose. THen, last night i was tinkering with a broken Bic lighter, the spring flew across the room and solved my problem I still have a few camber issues to adjust but all in all the back end is working out nicely.
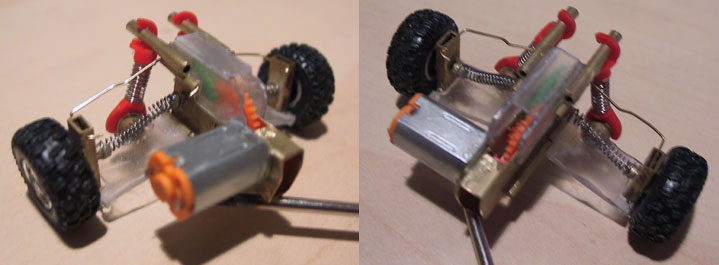
For those shocks, they are for an offroad slot car. The springs were too soft so i modified them to fit a set of zzmt shocks and they are just perfect. Its scary how well those mystery parts came together.
Anyways, on to the front end and the chassis.
STG
For those drive shafts, i got tired of making U joints and since this is only rear wheel drive i discovered a different way ot doing things. I searched far and wide for the perfect springs(hardwear stores, hobby stores, junk droors...) but i just couldnt find a spring that would work for my purpose. THen, last night i was tinkering with a broken Bic lighter, the spring flew across the room and solved my problem
For those shocks, they are for an offroad slot car. The springs were too soft so i modified them to fit a set of zzmt shocks and they are just perfect. Its scary how well those mystery parts came together.
Anyways, on to the front end and the chassis.
STG
-
civicsr2cool

- bitNinja
- Posts: 521
- Joined: Tue Mar 29, 2005 10:01 pm
- Location: Sagnasty, MI
- Contact:
-
Sporttracguy
- bitNinja
- Posts: 507
- Joined: Thu May 12, 2005 4:25 pm
- Location: Seattle, Washington USA
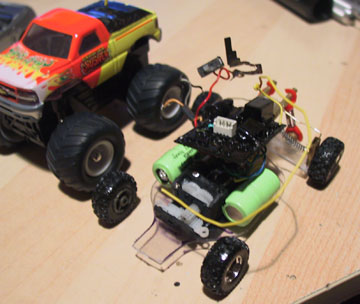
Here is a little mock up as to where it COULD go. I cant say for sure, I'm just trying to see what works and what doesn't. I think i will need to finish the two front suspension arms and the steering seperately before i mount them on the chassis (thats an experimental chassis, ill make a new one for the final piece)
STG
STG
-
Sporttracguy
- bitNinja
- Posts: 507
- Joined: Thu May 12, 2005 4:25 pm
- Location: Seattle, Washington USA
Buggy almost done!!!
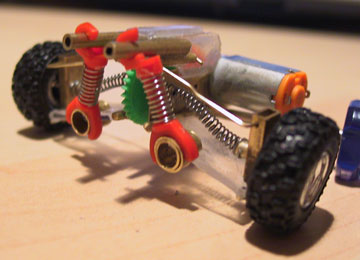
Ok guys, ive been working on this thing non stop for the last few hours and she is almost done.  I finished the front suspension and mounted it up at an angle (like the mini t is) I also mounted the steering box. and finished the chassis (for the most part). So now all that is left to do is hook up the steering struts, wire it all up, trim a few brass pieces that are too long and make a buggy body for it.
STG
STG
-
honda_s2000
- bitNinja
- Posts: 883
- Joined: Sat Oct 30, 2004 5:42 pm
- Location: New Zealand
-
Nasphere
- bitNinja
- Posts: 525
- Joined: Wed Jan 05, 2005 11:24 am
- Location: SoCal
- Contact:
Re: Buggy almost done!!!
You make it WAY too hard to keep up... Great work!Sporttracguy wrote:So now all that is left to do is hook up the steering struts, wire it all up, trim a few brass pieces that are too long and make a buggy body for it.
Whack!
-
grimmreap3r
- Posts: 8
- Joined: Wed Jan 18, 2006 7:42 pm