Page 1 of 2

Lowering a bit

Posted: Mon Apr 02, 2007 12:42 pm
by DKpimpas

Hey everybody. I´m new here. I have looked all around your site and found some sick machines!

My question to you big pimps is;
1) how do you lower your bit?
2) How do you make those wild bumpers?

would you help me?
that would be GREAT.!

Posted: Mon Apr 02, 2007 1:12 pm
by ChemicalInDependency
Try using the search engine. These questions, and im sure others you may have; have been answered before.

Posted: Mon Apr 02, 2007 5:34 pm
by crazydave
Well, sometime basic info like this that we all consider common knowledge, may be so old that it has become buried and hard to find. So I'll go ahead and cover it one more time.

Lowering the body- Ok, so the body is attached to the chassis with tabs and slots. You can either raise the slot, or lower that tab. In the beginning I think most people slot lowered their bits. The easiest way I've found to do this is take a cut off wheel for a dremel, and use a pair of scissors to cut it into a smaller circle about 1/4 inch in diameter. After you put it on your dremel you can spin it against a file to get it perfectly round again. This gives you a smaller cutting wheel to get up inside the body. When you cut your slot, the round shape of the wheel leaves the ends of your slot rounded. I've found glueing two thin strips of plastic on either side of the slot will keep the body centered.

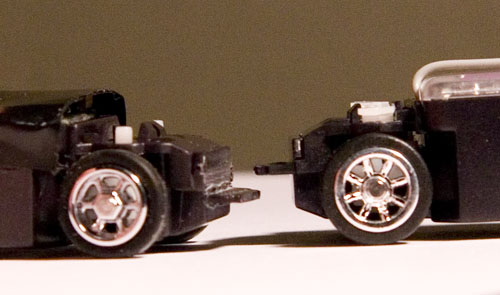
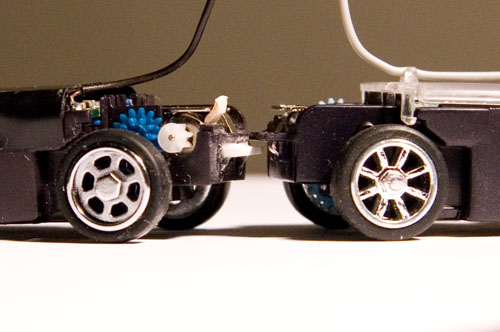
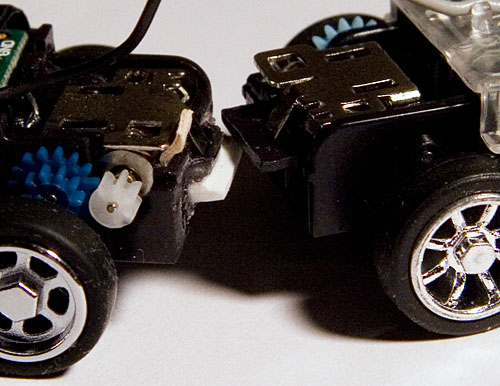
The way I believe most people do it now, and the way I prefer is to lower the tabs on the chassis. In the front its the same for a Zip Zap or a bit, but in the rear it is a little different for a bit. Either way, you gonna want to take hobby knife, like an Exacto and cut the stock tabs off just enough to where the body slips down. What's different on a bit is, you will have to leave enough tab to where the motor's heatsink will still have something to latch into. Which means you will more than likely have to shave out the back of the body to clear what remains of that tab. Its not the easiest or fastest way, but the best way I've found to do that is use your exacto blade to scrape that area away. (Notice I said "scrape" and not "cut". ;) ) Once your body slips down to where you want it, I stick the exacto blade in the slot to make a mark on the chassis where I want it. Then you want to take strips of plastic (I used to use zip zap packaging, but the inconsistant thickness made my bodies crooked, so now I use credit card plastic) and superglue them to the bottom of the remaining tab until they come down to where you want the top of your tab. The way I get my tabs the right width is to cut a strip at the approximate width, with an ever so slight angle. I stick the skinnier end in my slot, until it gets to a place where its snug. I mark it at the edge of the body, and cut it off there. Then when I glue the tab to the chassis I make sure that's the end that goes into the body.

Those are the two most common methods, but remember you're not limited to the stock slots. You could fill the slots for a more realistic look, and attach the body with velcro, screws, whatever your preference.


Wild bumpers- Not sure what you're asking. I'm assuming you mean the body kits people do, such as front spoilers. :???:
If that's the case, then most people superglue strips of plastic to their car. Use something like an emery board to shape it, and some fine git sand paper to finish it. Other people use putty for plastics such as they sell for models at most hobby shops. Again sanding away slowly to shape it. Putty can sometimes break off. A good technique is to start with the plastic to rough the shape out, and use the putty to help smooth it over.

Just like before you are not limited to these techniques. Whatever works for you, just be creative, and hey, if you figure a different way to do it, we'd love to hear it.


Ok that's the last time I'm going over body lowering for at least 365 days. the next guy who asks will have to do a search. :lol:

Posted: Mon Apr 02, 2007 5:39 pm
by CaboWabo
I think we should just make post in the chop shop about it and sticky it. Then it'll be there forever... and ever.

thanks a lot!

Posted: Tue Apr 03, 2007 2:55 am
by DKpimpas
I had tried to search it but couldn´t find it anywhere so thats why i asked. 8-)
-It would be a good idea to make an article about it. But I don´t know how to do that yet. So maybe one of you experienced guys would try?

-Big thanks to Crazydave!!
:-o

Posted: Tue Apr 03, 2007 7:33 am
by DarkTari
CaboWabo wrote:I think we should just make post in the chop shop about it and sticky it. Then it'll be there forever... and ever.
4Ever-ever ?? :lol:

Re: thanks a lot!

Posted: Wed Apr 04, 2007 9:33 pm
by ibjamn
DKpimpas wrote:I had tried to search it but couldn´t find it anywhere so thats why i asked.
I couldn't find it back when I looked for it. If you put the words "tab lowered" in the search engine, you get build descriptions.
Even staring at chassis pics, some of you guys made it so clean that it looks original
:-o

Posted: Wed Apr 04, 2007 10:49 pm
by SuperFly
I'm not going to write a tutorial right now, but here's some pictures that illustrate my technique. In all the pictures, the car on the right is stock for comparison. Notice the lack of PCB cover on the lowered chassis. No room for it if you really want to drop it to the floor.

In the first picure, you can see I used a razor saw in a mitre box (the aluminum channel thing made by Xacto) to get a really clean cut and cut the tab off where it meets the chassis, and then just reglue it lower down the front of the chassis. Just a hair more than the thickness of the tab is about as low as you can get with most bodies.


Image


So what I do on the back is cut a little styrene "C" shape, and glue it under the stock tab/motor clip latch. Then I take a Dremel or a file and carefully reduce the stock tab so there's just enough left to hold the motor clip in place. It is a little bit tricky to get the new styrene tab just the right thickness, width and depth , but it can be done. You will usally have to carve/dremel away a little plastic from the body right above the slot, there's usually two kind of knobby bulges that don't allow the lowered tab to slide into the slot. Depending on the body, you will have to very carefully thin the body from the inside at the arch of the wheel well to prevent tire rub.

Image

Image

I guess I wrote a tutorial afterall. :?

Posted: Thu Apr 05, 2007 2:06 pm
by Nasphere
Hmm.. I've always wondered how ya'll did that.. Pretty cool!

Superfly: Doesn't that dark blue idler remind you of a 2 speed setup?? :-D I had to doubletake to make sure it was a normal gear lol!

Posted: Thu Apr 05, 2007 2:24 pm
by SuperFly
Nasphere wrote:Hmm.. I've always wondered how ya'll did that.. Pretty cool!

Superfly: Doesn't that dark blue idler remind you of a 2 speed setup?? :-D I had to doubletake to make sure it was a normal gear lol!
It's not a normal gear, it's a KITT racer gear. Normal bit gears are in the 12:1 - 9:1 range, and that gearing setup is near 3:1. You need mosfets to run it. Not quick, but very, very fast.

Posted: Thu Apr 05, 2007 2:31 pm
by Nasphere
SuperFly wrote:
Nasphere wrote:Hmm.. I've always wondered how ya'll did that.. Pretty cool!

Superfly: Doesn't that dark blue idler remind you of a 2 speed setup?? :-D I had to doubletake to make sure it was a normal gear lol!
It's not a normal gear, it's a KITT racer gear. Normal bit gears are in the 12:1 - 9:1 range, and that gearing setup is near 4:1. You need mosfets to run it. Not quick, but very, very fast.
Lol, I meant solid, one piece "normal" gear.. I was refering to like 1:10 scale trucks n cars with 2 speed trannies, looks like one at first glance :-)

Posted: Thu Apr 05, 2007 2:50 pm
by SuperFly
Nasphere wrote:
SuperFly wrote:
Nasphere wrote:Hmm.. I've always wondered how ya'll did that.. Pretty cool!

Superfly: Doesn't that dark blue idler remind you of a 2 speed setup?? :-D I had to doubletake to make sure it was a normal gear lol!
It's not a normal gear, it's a KITT racer gear. Normal bit gears are in the 12:1 - 9:1 range, and that gearing setup is near 4:1. You need mosfets to run it. Not quick, but very, very fast.
Lol, I meant solid, one piece "normal" gear.. I was refering to like 1:10 scale trucks n cars with 2 speed trannies, looks like one at first glance :-)
Yeah, I got ya. :-o

I was just pointing out for the uninitiated that it was in fact not the run-of-the-mill teal/orange/blue gear that most people are familiar with.

It looks like a 2 speed tranny because the large gear on the idler that contacts the motor pinion isn't that much bigger than the small part that contacts the axle gear.

Posted: Thu Apr 05, 2007 7:34 pm
by Maxximum Attack
Hey DKPimpas, you should change the name of this topic to something more useful like " How to lower a bit" or something along those lines so that future persons can find this information easier.

Hey, you may even get it stickied :-o

Maxx

Posted: Fri Apr 06, 2007 12:43 am
by betty.k
you carribeans really are psychic! :eek: :lol:

Posted: Fri Apr 06, 2007 8:58 am
by Maxximum Attack
Suuuuure Mon!

Image

:lol: