
Mold Casting Tutorial
-
steelwoolghandi

- bitPimp
- Posts: 1696
- Joined: Fri Jun 11, 2004 11:53 am
- Location: RIGHT BEHIND YOU!!
- Contact:
Mold Casting Tutorial
I searched the Internet for a simple tutorial on making and casting molds and well have not found anything that was what I would call Simple.
I have put together what I like to think as a simple and quick tutorial for casting a body using Clear Casting Epoxy. I use Liquid Latex Rubber to build the molds of the item I wish to cast.
1. I use Mold Builder by Casting Craft to build my molds there are other Liquid Latex Rubber products out there and can be purchased at any LHS. I apply coats of the Latex to the outside of the item I am going to make a mold of. Make sure they are thin coats as the thicker they are the longer it takes to dry.
If you need to get the mold to dry faster use a heat gun to dry the Liquid Latex Rubber but be careful to close and you can melt the mold or the item your casting.
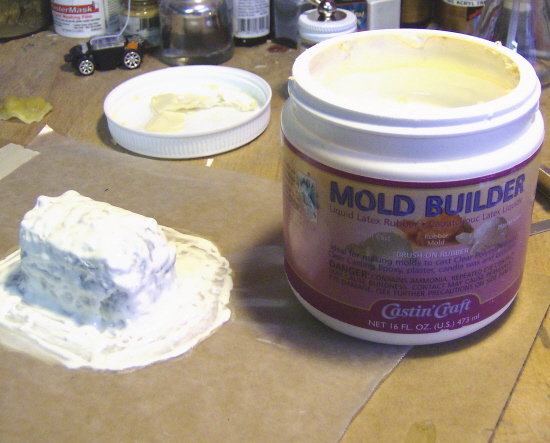
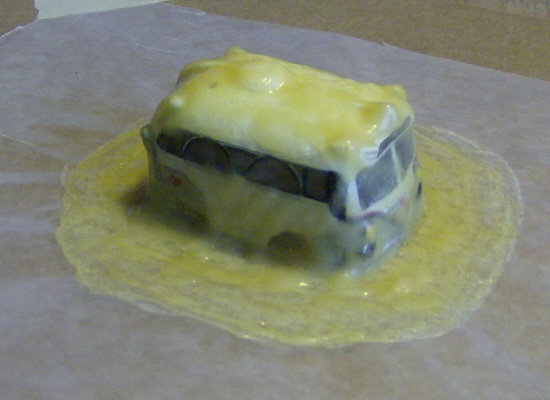
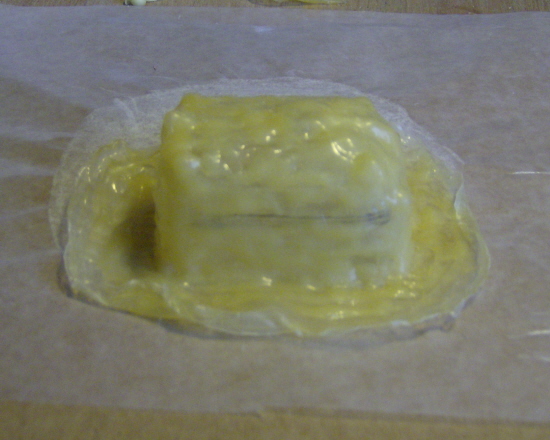
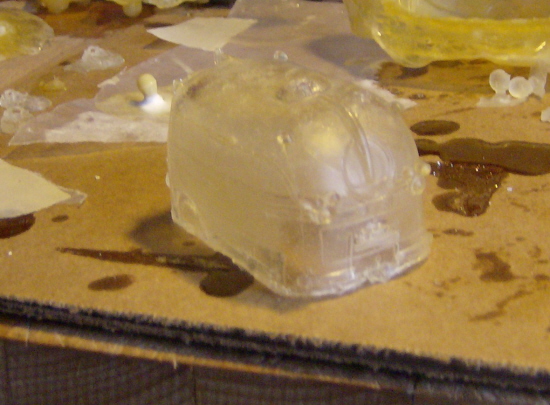
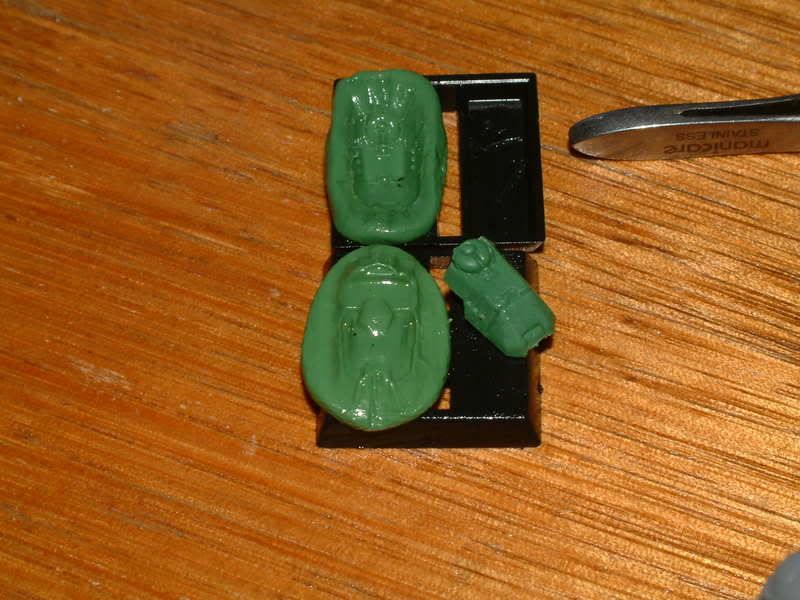
2. I chose to use the Disney bus as my item to cast. I did not want the Mickey ear windows and some of the bodylines so I covered them with tape so that they did not show up on the final casting. I use waxed paper to set my mold on so that the Latex will not stick to the surface.
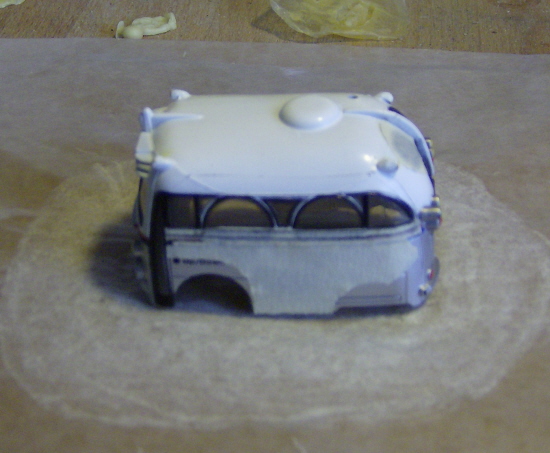
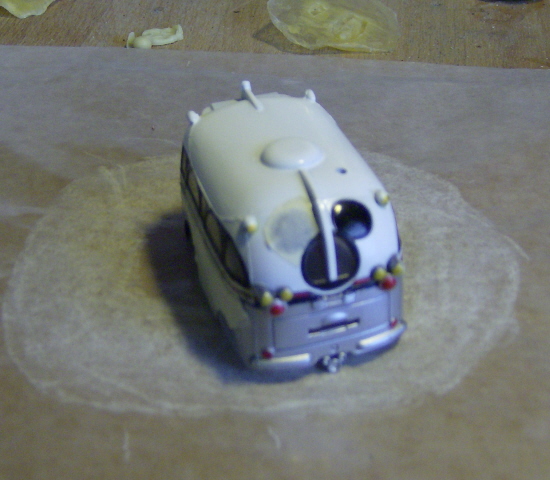
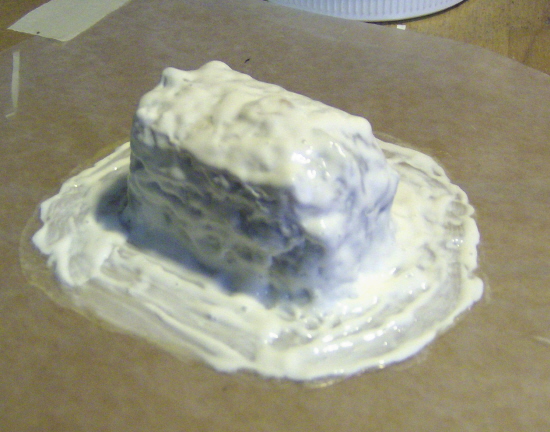
3. The mold has now been covered about 6 times always allowing the mold to completely dry before covering it again. Make sure you allow the latex to spread around your item (Bus) so that you have a
Flange around the item and something to hold on to. This Flange will support the mold during casting.
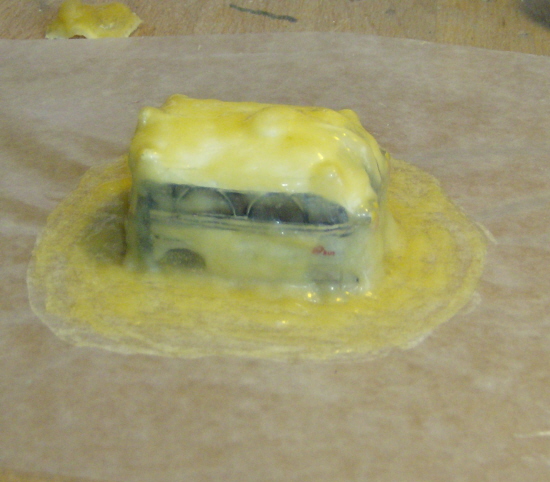
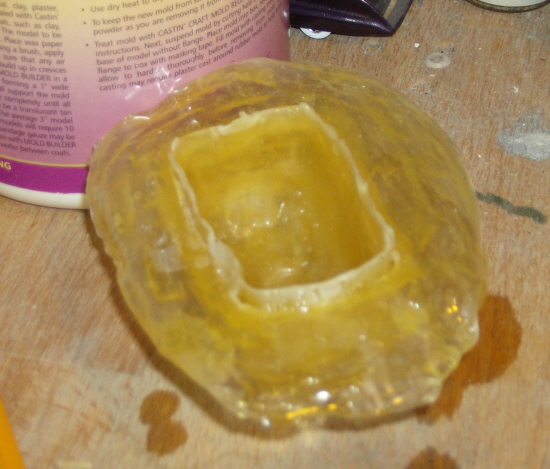
4. Now that the exterior mold is finished and has enough layers to make it sturdy during casting you can now coat the inside of the item your going to cast. Repeat the process you did on the exterior just on the inside this will form the inside of the mold.
5. I have turned the outside mold inside out because there are still some bodylines on the windows (Mickey’s ears) in the windows I wish to remove. I take some of the liquid Latex and fill the lines in wiping them clear so they only cover the lines. I repeat if necessary to make sure all the lines are removed I need removed.
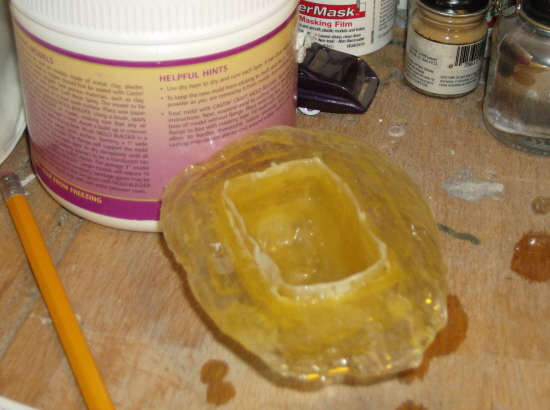
6. Now the interior mold is finished. I need to make sure any unwanted material is trimmed off of the mold (inside mold and outside mold) this would be anything I don’t want to show up on the finished cast piece. Also make sure there is no lip around the edges so that when your pour your Epoxy it will flow smoothly.
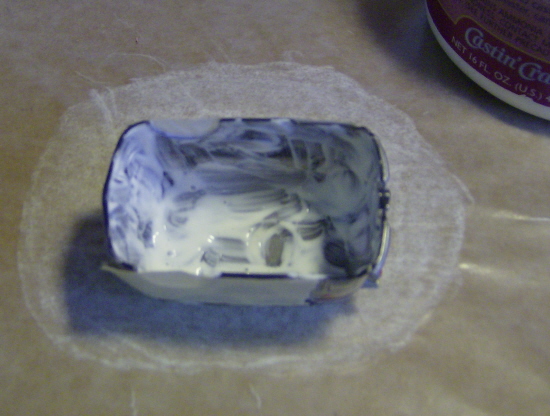
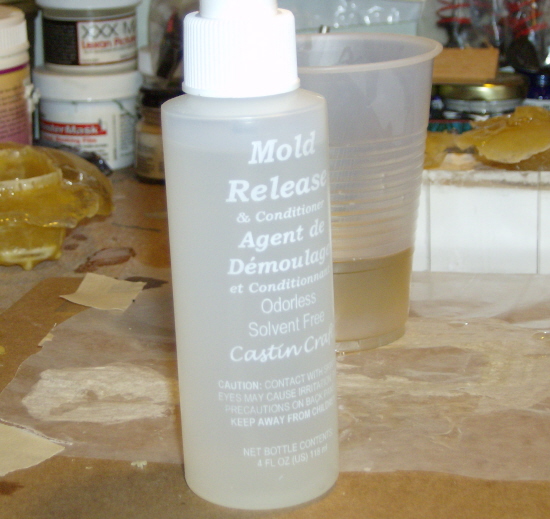
7. Now to prep the mold if you were to pour now the casting epoxy would stick to the mold making it hard if not imposable to get out. I use mold release agent in spray form to spray on the mold and make it easy to remove the casting once dry. If you spray the mold after use it will also condition it.
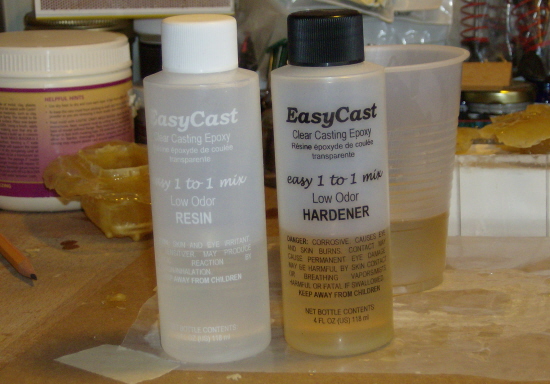
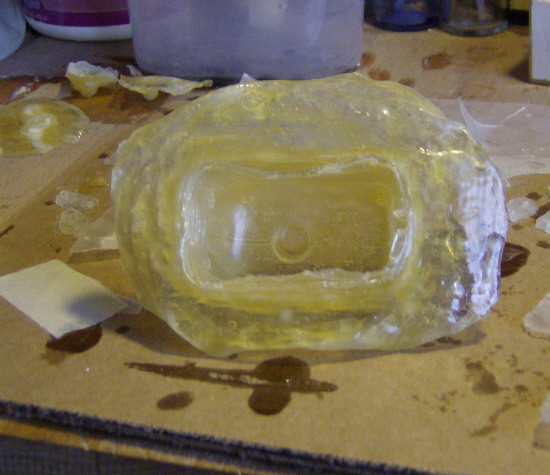
8. Now for the casting. I use Easy Cast Clear Casting Epoxy and it comes in two parts. You have a Resin and a Hardener. You mix it 1 to 1 one part hardener to one part Resin. Instead of buying a mixing cup I just use cheap plastic cups and pour one ounce of water at a time to mark the points on the side of the cup. Mix the two parts according to directions (these directions show mixing the two parts for 2 min. putting the mixture into another cup then mixing for 1 Min. longer). Now your are ready to pour the casting.
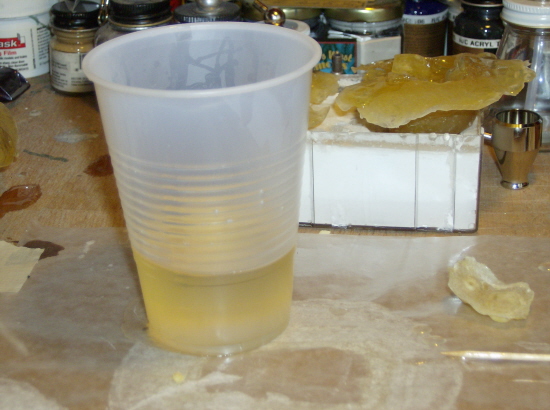
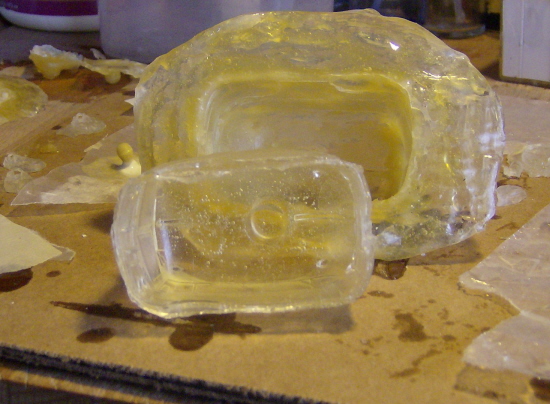
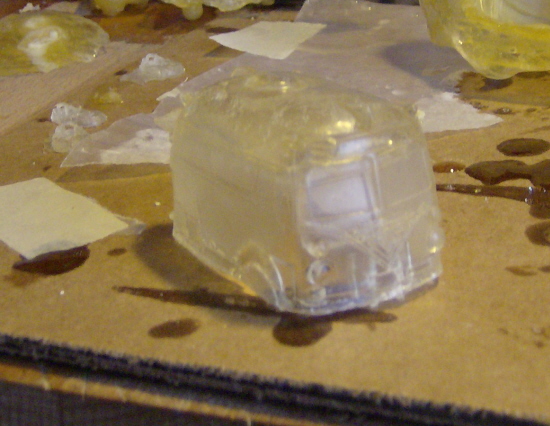
9. Pour a small amount into the main outside mold then take your inside mold and squeeze it into the outside mold. It will at this point squish the casting Epoxy up to the edge making a thin casting all around. You might have to put a weight on the inside mold to hold it down and in place.
10. Allow the mold to dry for 24 hours you will find with Epoxy the thinner the casting the longer it takes to dry. Make sure you put the mold up so it cannot get damaged or dented.
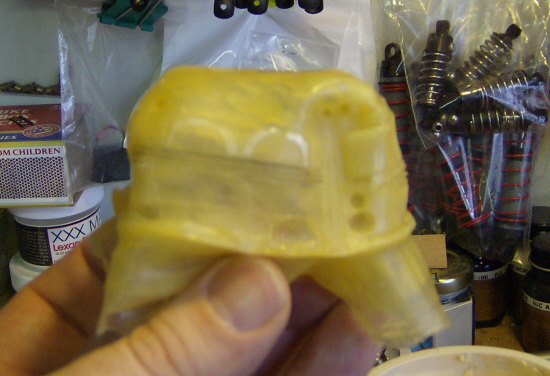
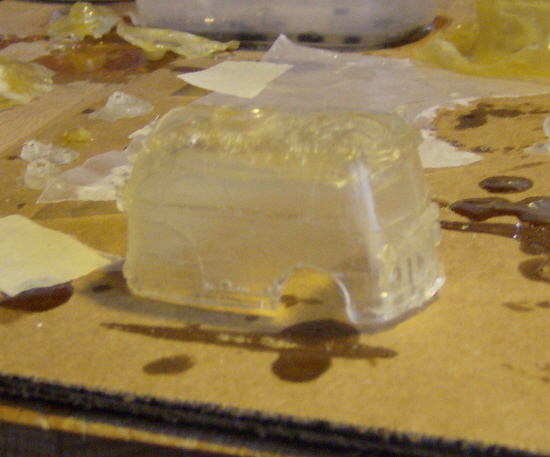
11. Once it’s dried for 24 hours then remove the inside mold first carefully, if it’s still sticky or real soft allow it to dry longer. The mold even after 24 hours will be soft so handle it gently. Once the inside is removed then gently remove the outside mold and you will have your final cast done.

12. Your final cast will remain soft and easy to bend for at least 48 hours. This is a good thing because you can easily trim any access off the casting and cut out any pieces you wish to remove (wheel wells, windows etc.)
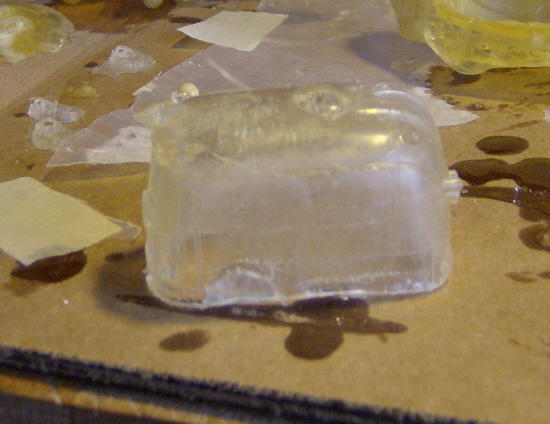
13. Once our cast is completely dry and complete you can sand it, Fill it, prime it and paint it the way you would like.
I hope this quick tutorial helps you to build a mold and casting if you have any questions or need more pictures please let me know.
I have put together what I like to think as a simple and quick tutorial for casting a body using Clear Casting Epoxy. I use Liquid Latex Rubber to build the molds of the item I wish to cast.
1. I use Mold Builder by Casting Craft to build my molds there are other Liquid Latex Rubber products out there and can be purchased at any LHS. I apply coats of the Latex to the outside of the item I am going to make a mold of. Make sure they are thin coats as the thicker they are the longer it takes to dry.
If you need to get the mold to dry faster use a heat gun to dry the Liquid Latex Rubber but be careful to close and you can melt the mold or the item your casting.
2. I chose to use the Disney bus as my item to cast. I did not want the Mickey ear windows and some of the bodylines so I covered them with tape so that they did not show up on the final casting. I use waxed paper to set my mold on so that the Latex will not stick to the surface.
3. The mold has now been covered about 6 times always allowing the mold to completely dry before covering it again. Make sure you allow the latex to spread around your item (Bus) so that you have a
Flange around the item and something to hold on to. This Flange will support the mold during casting.
4. Now that the exterior mold is finished and has enough layers to make it sturdy during casting you can now coat the inside of the item your going to cast. Repeat the process you did on the exterior just on the inside this will form the inside of the mold.
5. I have turned the outside mold inside out because there are still some bodylines on the windows (Mickey’s ears) in the windows I wish to remove. I take some of the liquid Latex and fill the lines in wiping them clear so they only cover the lines. I repeat if necessary to make sure all the lines are removed I need removed.
6. Now the interior mold is finished. I need to make sure any unwanted material is trimmed off of the mold (inside mold and outside mold) this would be anything I don’t want to show up on the finished cast piece. Also make sure there is no lip around the edges so that when your pour your Epoxy it will flow smoothly.
7. Now to prep the mold if you were to pour now the casting epoxy would stick to the mold making it hard if not imposable to get out. I use mold release agent in spray form to spray on the mold and make it easy to remove the casting once dry. If you spray the mold after use it will also condition it.
8. Now for the casting. I use Easy Cast Clear Casting Epoxy and it comes in two parts. You have a Resin and a Hardener. You mix it 1 to 1 one part hardener to one part Resin. Instead of buying a mixing cup I just use cheap plastic cups and pour one ounce of water at a time to mark the points on the side of the cup. Mix the two parts according to directions (these directions show mixing the two parts for 2 min. putting the mixture into another cup then mixing for 1 Min. longer). Now your are ready to pour the casting.
9. Pour a small amount into the main outside mold then take your inside mold and squeeze it into the outside mold. It will at this point squish the casting Epoxy up to the edge making a thin casting all around. You might have to put a weight on the inside mold to hold it down and in place.
10. Allow the mold to dry for 24 hours you will find with Epoxy the thinner the casting the longer it takes to dry. Make sure you put the mold up so it cannot get damaged or dented.
11. Once it’s dried for 24 hours then remove the inside mold first carefully, if it’s still sticky or real soft allow it to dry longer. The mold even after 24 hours will be soft so handle it gently. Once the inside is removed then gently remove the outside mold and you will have your final cast done.
12. Your final cast will remain soft and easy to bend for at least 48 hours. This is a good thing because you can easily trim any access off the casting and cut out any pieces you wish to remove (wheel wells, windows etc.)
13. Once our cast is completely dry and complete you can sand it, Fill it, prime it and paint it the way you would like.
I hope this quick tutorial helps you to build a mold and casting if you have any questions or need more pictures please let me know.
-
sidewinder
- bitProphet
- Posts: 3165
- Joined: Wed Apr 25, 2007 6:31 pm
- Location: Walmart
Thats a pretty good explination, I tried the mold builder but didn't have enough pactience tolet it dry properly... Plus it smells really bad...so I got a kit from Alumilte and tried theirs...the upside is it sets in about five minutes...the down side is you have to be very careful or you get bubbles. Which is how I came up with my Ferrari idea...anyway I'm glad you posted this because I have been thinking about giving the clear resin and mold builder another go (since the Alumilite stuff cost a lot more) I was thinking of makeing some windshields, etc. Thanks for the great tut.
The smallest minority on earth is the individual. Those who deny individual rights cannot claim to be defenders of minorities. - Ayn Rand
-
steelwoolghandi
- bitPimp
- Posts: 1696
- Joined: Fri Jun 11, 2004 11:53 am
- Location: RIGHT BEHIND YOU!!
- Contact:
thanks man I was thinking it was an easy read. I have worked witht he Alumilite and yes its expensive and it is real hard to get the bubles out. Mine has bubbles but nothing that efects the outside finish of the casting. nothing that cant be touched up real easy.sidewinder wrote:Thats a pretty good explination, I tried the mold builder but didn't have enough pactience tolet it dry properly... Plus it smells really bad...so I got a kit from Alumilte and tried theirs...the upside is it sets in about five minutes...the down side is you have to be very careful or you get bubbles. Which is how I came up with my Ferrari idea...anyway I'm glad you posted this because I have been thinking about giving the clear resin and mold builder another go (since the Alumilite stuff cost a lot more) I was thinking of makeing some windshields, etc. Thanks for the great tut.
I hope you give it another try soon!
-
redrustbucket

- bitGangsta'
- Posts: 363
- Joined: Wed Mar 15, 2006 9:41 pm
- Location: sunny acres, fl
-
sidewinder
- bitProphet
- Posts: 3165
- Joined: Wed Apr 25, 2007 6:31 pm
- Location: Walmart


-
crazydave

- bitPimp
- Posts: 6874
- Joined: Thu Apr 17, 2003 9:05 am
- Location: Koolsville
-
z-beam

- bitGangsta'
- Posts: 228
- Joined: Sat Mar 29, 2003 8:14 pm
- Location: byron bay Australia
- Contact:
love it!
ive been making 2 part molds to replicate warhammer parts for as while now. e.g
using epoxy putty that sets like hard rubber. works nice considering projects might look great with 10 of one part but they come in a kit with only 3 of that part for $30. some fools have been shown to have skills jut by how much cash they can expend on parts but i iz smart
im really keen to know if there are ways to do this without getting any bubbles in that crystal clear resin?
id love to be able to cast up a custom body and keep the windows clear.
-
sidewinder
- bitProphet
- Posts: 3165
- Joined: Wed Apr 25, 2007 6:31 pm
- Location: Walmart
I don't know how much it cost or if you can build one yourself but for making windshields and other things that need to be clear they make a vacume chamber for casting. I've never seen one but I have read about it. Maybe google vacume chamber and resin casting?z-beam wrote:love it!
ive been making 2 part molds to replicate warhammer parts for as while now. e.g
using epoxy putty that sets like hard rubber. works nice considering projects might look great with 10 of one part but they come in a kit with only 3 of that part for $30. some fools have been shown to have skills jut by how much cash they can expend on parts but i iz smart
im really keen to know if there are ways to do this without getting any bubbles in that crystal clear resin?
id love to be able to cast up a custom body and keep the windows clear.
The smallest minority on earth is the individual. Those who deny individual rights cannot claim to be defenders of minorities. - Ayn Rand
-
z-beam
- bitGangsta'
- Posts: 228
- Joined: Sat Mar 29, 2003 8:14 pm
- Location: byron bay Australia
- Contact:
-
sidewinder
- bitProphet
- Posts: 3165
- Joined: Wed Apr 25, 2007 6:31 pm
- Location: Walmart
Hey I just found this post on a casting site, I don't know anything about the stuff other than whats said here, so take it for what its worth..."Far easier and more affordable is to go to industrialpolymers.com and look at their clear casting urethane resins. One in particular called Clear Elegance looks like water once cured and requires no degassing to create a bubble free final product. Have a look and see - it's pretty cool stuff =) "z-beam wrote:a vacuum chamber? ouch...
i dont think id be investing in that level of tech to make a few bodies
It was on this url:
http://www.taxidermy.net/forums/Molding ... D986E.html Evidently they have plans to make your own vacume chamber as well. Just n case you really want to make some clear stuff.
The smallest minority on earth is the individual. Those who deny individual rights cannot claim to be defenders of minorities. - Ayn Rand
-
papataratuga
- bitHood
- Posts: 49
- Joined: Sun Apr 29, 2007 9:45 am
- Location: Basel, Switzerland
Not that much of a problem! Go have a look here. Buil myself one low-budget-vaccum-desk. Was in the zine "make" a few months ago. And here you can read about my first tries to get a Body copied... Works quite fine, all you need is a vaccum cleaner and an oven... Hope you get through the German Howto... otherwse I suggest you go to "make" Homepage and look for it there. Surely you could reorder the issue. I'll check what month it was.z-beam wrote:a vacuum chamber? ouch...
i dont think id be investing in that level of tech to make a few bodies
-
sidewinder
- bitProphet
- Posts: 3165
- Joined: Wed Apr 25, 2007 6:31 pm
- Location: Walmart
Not a Problem! Here's a very literal translation because I didn't want to take the time to re-arrange things between the two dialects (because its 3am and I'm tired) : this is the text that goes with papataratuga's post on the link. Still check out the link he's got some great pictures:papataratuga wrote:Not that much of a problem! Go have a look here. Buil myself one low-budget-vaccum-desk. Was in the zine "make" a few months ago. And here you can read about my first tries to get a Body copied... Works quite fine, all you need is a vaccum cleaner and an oven... Hope you get through the German Howto... otherwse I suggest you go to "make" Homepage and look for it there. Surely you could reorder the issue. I'll check what month it was.z-beam wrote:a vacuum chamber? ouch...
i dont think id be investing in that level of tech to make a few bodies
After Hottie started the Challenge for the Nascar mass production and I pressurized myself by mine "ichmachauchmit" again once, here a small guidance for a simple vacuum box follows to to build.
I built the box in approx. 2h finished. And the material is very easy me to approximately 20 euro cost.
Putting one to the pictures
1. Material overview
2. Frameworks build: The foil is warmed up later on a second framework strained in the furnace. Therefore the dimensions fit the furnace. Here approx. 35cm x 50cm
3. Into a side panel a hole comes where dust-cleanly is later installed. 3 holes with a 20mm drill and with Stechbeitel repaired...
4.... result in the following picture.
5. A dust clean nozzle flat-polished (damits closely locks) and up.
6. Framework finished bolts. Soil with (many) small screws on the frameworks besfestigt.
7. Small supporting columns, so that the cover does not sag the negative pressure when sucking, with wood glue fastens.
8. Cover with (just as many) small screws fastened (hand hurts still)
9. Everything approximately with Ducttape closely made, smaller holes in the nozzle with power-kneaded sealed.
(picture is missing) I made the entire frameworks again really close last.
There were a couple of words I couldn't figgure out so I left them the way they were writen. But I think if you look at the pictures you should be able to get the meaning.
BTW, this is a vacume box that can be used to make some really cool stuff like the full size lexan bodies on 1/10 scale cars. You can get some amazing detail with a little practice, and there are cheap sources for plastic so you don't have to pay the LHS prices for lexan. Thanks papataratuga
The smallest minority on earth is the individual. Those who deny individual rights cannot claim to be defenders of minorities. - Ayn Rand
-
steelwoolghandi
- bitPimp
- Posts: 1696
- Joined: Fri Jun 11, 2004 11:53 am
- Location: RIGHT BEHIND YOU!!
- Contact:
I don't care what they say about no bubbles and degassing no matter what casting material you use there will be some bubbles. Maybe less depending on the material but still bubbles.sidewinder wrote:Hey I just found this post on a casting site, I don't know anything about the stuff other than whats said here, so take it for what its worth..."Far easier and more affordable is to go to industrialpolymers.com and look at their clear casting urethane resins. One in particular called Clear Elegance looks like water once cured and requires no degassing to create a bubble free final product. Have a look and see - it's pretty cool stuff =) "z-beam wrote:a vacuum chamber? ouch...
i dont think id be investing in that level of tech to make a few bodies
It was on this url:
http://www.taxidermy.net/forums/Molding ... D986E.html Evidently they have plans to make your own vacume chamber as well. Just n case you really want to make some clear stuff.
I have a buddy in Austin that makes lexan bodies and parts using his oven and a box with his home vaccume and makes some real cool stuff. Its cheap and the biggest cost is the Lexan!
-
bengomez
- Posts: 1
- Joined: Tue Feb 03, 2009 1:14 am
Re: Mold Casting Tutorial
I think plastic molding is a great thing to do for some good reasons.... plastic industry are now growing in such rapid industries...
_________________
Rapid Manufacturing
_________________
Rapid Manufacturing