My Multi-1/64th charger
Posted: Tue Aug 23, 2005 12:14 am
I think it was Superfly that built a charger with a wall wart and Motorworks base. I've been planning one for a while, and I've been experimenting with a few AC adapters, that I've had a around, but I finally went to the rat shack and got me a multi-voltage adaptor for $10.99.
I remember reading about someone building one of these for bits way back in the early day of bits over at TinyRC, and he was saying he thought 1000mA was ideal, as lower mA ratings didn't warm the batteries. Considering these batteries rated charge rate, I thought that was pretty extreme. I think he was trying to get a full charge in a 45 second cycle.
Anyways, that may seem off track, but that's been my hang up about building a permanent stand alone charger. After determining that 800mA, 600mA wall warts charged a little fast for my taste, I went for 300mA when I finally went to make my purchase.
Then I installed a mini plug in a Motorworks base. Since I had the extra space, I chained together a bit, Thunder Charger, OG Zip Zap, Zip Zap SE, and a mini plug that's good for, Superslicks, Muscle Machines, NKOK RCs, and possibly an Epoch, if I put a voltage reversal switch on it before the plug.
So that covers most of my bases. I can always put a mini jack in the controller of the ones not covered.
I figured since I'd be plugging into the wall, and have essentially an endless supply of energy, a timer cut off would be the safest way to go. I wish I could whip up something with adjustable timing, but the stock Motorworks one works fine for now, it seems to get all the juice through better than some. So mounted that with a single screw down in the corner where it'd be out of the way.
My other hangup that kept me from building this before was how to make a button for the latch on Zip Zap bases. I had decided to just go for it, and slap it together, when half way through, I got the ingenious idea to cut the ends off antennas.
I made a top from the side of a Zip Zap package. Cut holes to fit each base, and spray painted it. It's a little rough, but it works.
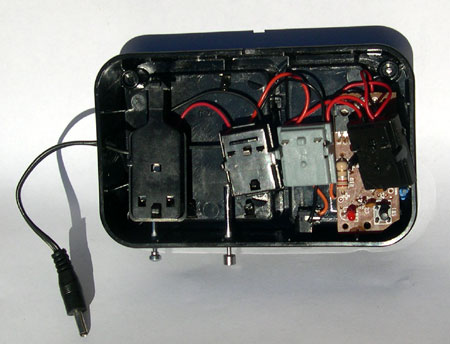
Here's the insides before I put it all together.

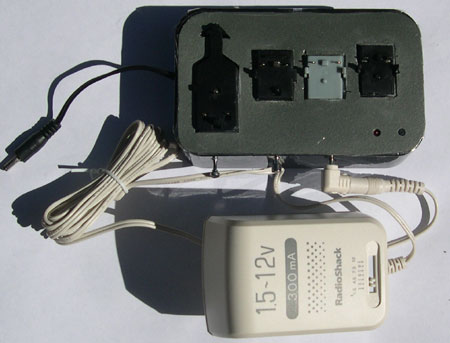
Then all together. It's a little rough still. Need to trim more off the top to fit it better, and just taped down, until I'm done modifying the insides.

It works great. Charges at nearly exactly the same rate it does with batteries. Charging at the stock "approx. 45 seconds", for 3 cycles was about perfect. I charged up car after car, and never worried about running out of juice. Much more fun.
I remember reading about someone building one of these for bits way back in the early day of bits over at TinyRC, and he was saying he thought 1000mA was ideal, as lower mA ratings didn't warm the batteries. Considering these batteries rated charge rate, I thought that was pretty extreme. I think he was trying to get a full charge in a 45 second cycle.
Anyways, that may seem off track, but that's been my hang up about building a permanent stand alone charger. After determining that 800mA, 600mA wall warts charged a little fast for my taste, I went for 300mA when I finally went to make my purchase.
Then I installed a mini plug in a Motorworks base. Since I had the extra space, I chained together a bit, Thunder Charger, OG Zip Zap, Zip Zap SE, and a mini plug that's good for, Superslicks, Muscle Machines, NKOK RCs, and possibly an Epoch, if I put a voltage reversal switch on it before the plug.
So that covers most of my bases. I can always put a mini jack in the controller of the ones not covered.
I figured since I'd be plugging into the wall, and have essentially an endless supply of energy, a timer cut off would be the safest way to go. I wish I could whip up something with adjustable timing, but the stock Motorworks one works fine for now, it seems to get all the juice through better than some. So mounted that with a single screw down in the corner where it'd be out of the way.
My other hangup that kept me from building this before was how to make a button for the latch on Zip Zap bases. I had decided to just go for it, and slap it together, when half way through, I got the ingenious idea to cut the ends off antennas.
I made a top from the side of a Zip Zap package. Cut holes to fit each base, and spray painted it. It's a little rough, but it works.
Here's the insides before I put it all together.

Then all together. It's a little rough still. Need to trim more off the top to fit it better, and just taped down, until I'm done modifying the insides.

It works great. Charges at nearly exactly the same rate it does with batteries. Charging at the stock "approx. 45 seconds", for 3 cycles was about perfect. I charged up car after car, and never worried about running out of juice. Much more fun.


