Page 1 of 2
The Hobbit Holes Daily Driver gets some fixes
Posted: Sat May 05, 2007 9:26 am
by BilboBaggins
OK, I've been messing around with my little Micro T. Doing a few upgrades and fixes when things broke.
In this shot it shows some of my little details.
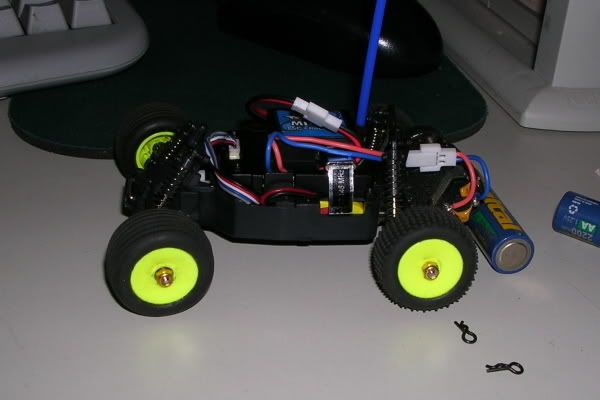
I've added threaded axles (I personally think this is a must), BRP Ball Bearings, Guitar Pick steering linkage (Thanks Crazy Dave) and my latest an antenna tube.
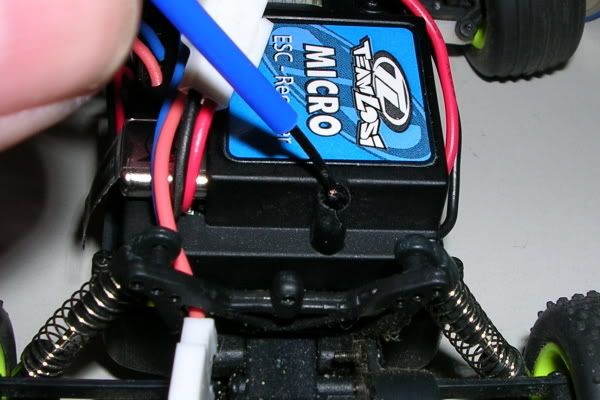
The reason for the antenna tube is that the antenna wire lost it's covering where it comes out of the receiver. So I took off the cover for the ESC/Receiver and drilled a larger (way larger) hole about ½ to ¾ way down. I took a spare antenna tube that my loving wife had in her RC bag (She has more 18th scale stuff than I do) and cut it down to the length I needed. I didn't have any Cat5 or a guitar string to replace the antenna at this time.
After showing her this I immediately had to do the same to hers (wait that was my second one, how did this happen.)
The guitar pick steering linkage was easy. I went to the Guitar Center next door to the HobbytownUSA in Whitehall, Pa. It was fun to see the guy's reaction to me buying guitar picks to fix an RC car. 12 picks for around 4 bucks and I make 5 links from a guitar pick. I'm set for life. Wait till I go back to pick up a steel guitar string to replace the antenna later. I just need to find out which string is it.
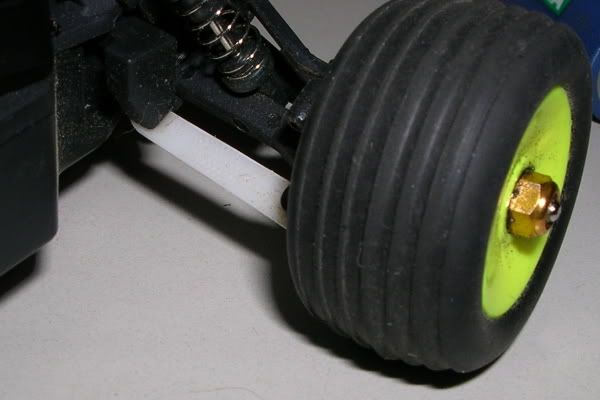
This is the first set of steering rods I've used that haven't broken in 2 runs or I haven't broken the front knuckle (zip tie, first run). These are now installed on both of the Micro T's in the house.
I've been running this little guy a lot and have broken a few parts (mine: steering knuckle and rear hub, wifes: rear arm mount) and it's been getting a beating. I figured I'd clean up the body and redo some of the body lines I messes up originally. Pulled out some Alcohol and removed the marker and found my fine tipped sharpies and redid the lines. They are less heavy handed now.
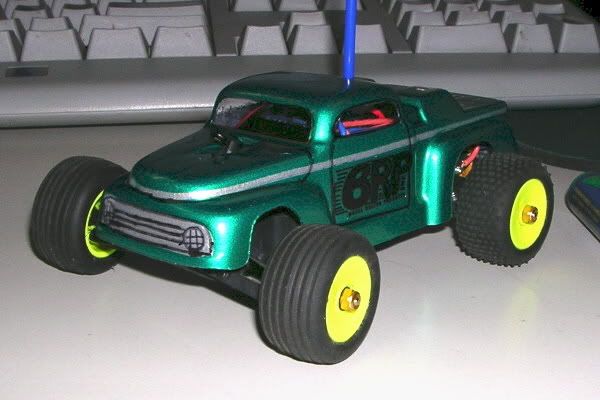
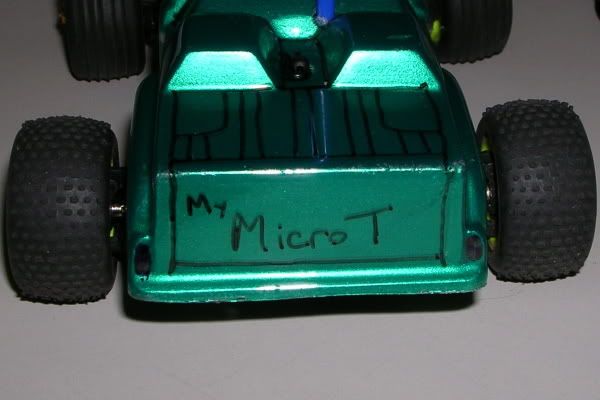
The tailgate plays homage to my wife's first truck (Green and gold Chevy Blazer) that had My Chevy on the rear.
I have a new body (Parma's Classic Custom) sitting at home to paint for this little guy. So he'll be ready for the local show and shine shortly.
Posted: Wed May 16, 2007 7:19 am
by BilboBaggins
Now some newer upgrades.
The hole for antenna tube was a little to thin and broke during a run at the track. That also caused the original antenna to break, talk about shorting the range.
I replaced the antenna wire with a piece given to me by the nice people at my track. Of course on the next run I broken the rear camber linkage. Back to tinkering.
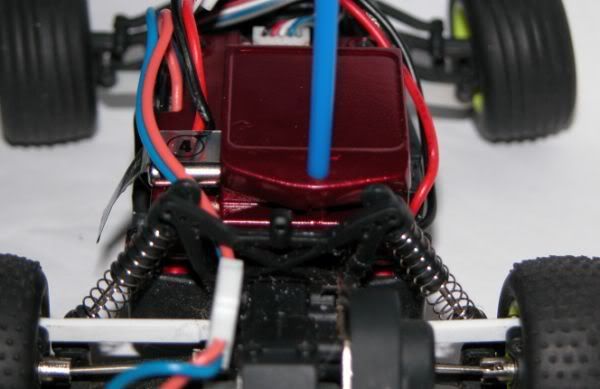
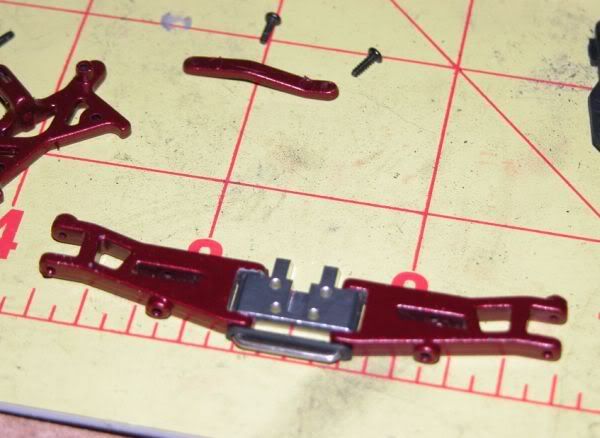
I added a few pieces of styrene to the rear of the ESC/Rec cover to fix the antenna hole. Then I used a strip of .060x.100 (1.5mm x 2.5 mm) to make some new rear camber linkage. It is thicker then the original but after filing the transmission side I got it to work. :wow:
I just painted the ESC/Rec cover a nice Garnet Red, I like the color.
This image shows the cover and new rear camber links.
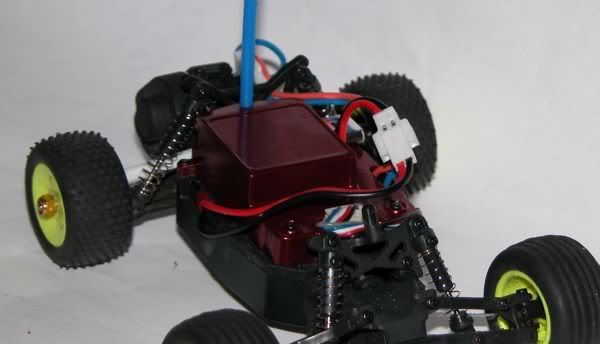
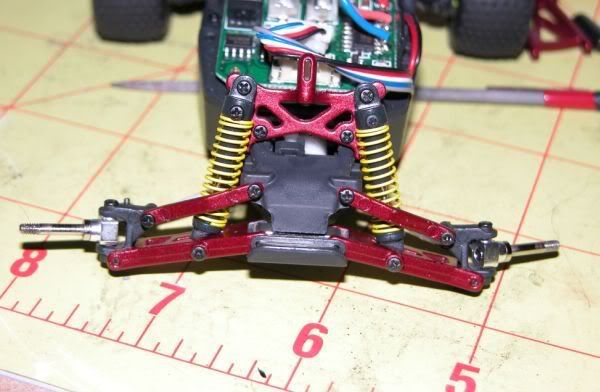
Here's a shot of the car without the body.

And one with the body.

I'm still trying to decide the paint scheme for the Parma Custom Classic body I have sitting here.
Upgrades done so far.
1. BRP Bearings
2. Guitar Pick Steering Linkage
3. Styrene Rear Camber Linkage
4. New Antenna Wire
5. Bilbo's Antenna Tube Upgrade
6. BRP Classic Hauler Body with strapping tape reinforced body holes.
Upgrades I'm still thinking about.
1. Aluminum Rear Hub Set
2. Aluminum Front C Hub Set
3. Aluminum Front Pivot Block
4. Aluminum Rear Pivot Block
5. Aluminum Front Spindle Set
6. Upgrading shocks and springs.
I'll be posting some more updates when they happen.
Posted: Wed May 16, 2007 8:17 am
by ibjamn
I see you have nuts

I mean, what axles are you using?

Posted: Wed May 16, 2007 8:32 am
by BilboBaggins
ibjamn wrote:I see you have nuts
I mean, what axles are you using?
Have nuts, am nuts, whatever.
They are Hot Racing threaded axles. The only problem I thin is that the threaded part is a little too short. I haven't had any problems but the lock nuts can be turned by hand to remove. I don't think that's a good situation. I'm going to find my other lock nuts I bought for the X-Mods (both use 2mm nuts) and see if it's any better.
But I saw that 3racing is coming out with CVD axles. Actually they are coming out with a lot of stuff, including a graphite chassis.
CVD's might go on my things to get list. Now if only MIP would make them and a ball differential.
I do like being able to make some of my own parts for this little guy. I wonder what the wife would say if I painted the arms and transmission?

Posted: Wed May 16, 2007 8:50 am
by ibjamn
Have nuts, am nuts, whatever.

Me too.....
But I saw that 3racing is coming out with CVD axles.Now if MIP would make them and a ball differential.
I do like being able to make some of my own parts for this little guy. I wonder what the wife would say if I painted the arms and transmission?
I think it would look really good. Maybe the motor cover, too. The tranny IMHO would be a pain, there is a little bit of grease that leaked/squeezed out of the diff assembly. So a good cleaning would fix that[/quote]
Posted: Wed May 16, 2007 4:38 pm
by crazydave
Man, I was gonna ask you why you would buy an alloy PCB cover.
That looks pretty cool. With the plastic work you did, it looks like an aftermarket piece when painted.
Thanks for the heads up on the 3racing CVD. I'd settle for a UV joint, but the less backlash the better.
Posted: Wed May 16, 2007 9:15 pm
by BilboBaggins
crazydave wrote:Man, I was gonna ask you why you would buy an alloy PCB cover.
That looks pretty cool. With the plastic work you did, it looks like an aftermarket piece when painted.
I still have to work on the wife's Micro T cover. I don't know if I'll paint hers.
I'm still debating about painting other parts (arms, gear cover, shock towers) to try and fool people looking at my car.
Posted: Fri May 25, 2007 8:59 pm
by BilboBaggins
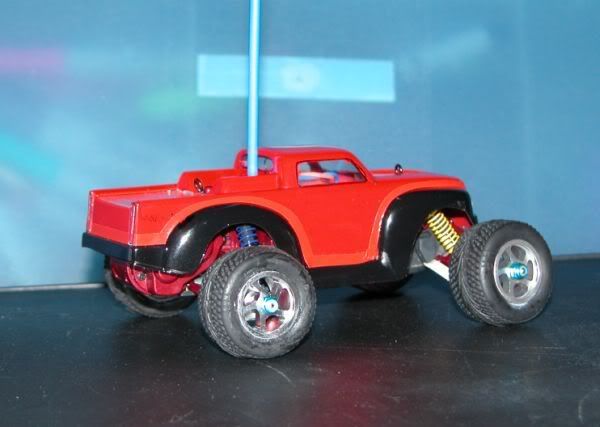
New image of the way I'm going with my Micro T.
Yes I did some work to the Gear Cover and I now have Sportwerks Blue Lock nuts. I didn't like that the gold ones could be removed by hand.
I have to wait until next Wednesday for the next batch of parts to arrive. I'll have to order some tires for the rims that are coming, I'm thinking Daytona Street Tires.
Posted: Fri May 25, 2007 9:28 pm
by crazydave
That gear cover looks good, and should be fairly safe from chipping, but I'd avoid painting suspension pieces, as you've mentioned. I did that to a xmod and it just looked a mess after a few runs.
Well damn, you're stocking up on the goodies, huh?
Those Daytona tires should be a good deal, but I'm just going to hang out for the Losi Street Meats. Since I'm sticking with the eclips, and I kinda dig the chrome dish wheels, but I am looking at some of the HR alloy wheels, more for show off than anything. I might go with the nuts so I can run those down the road.
Posted: Fri May 25, 2007 9:52 pm
by BilboBaggins
crazydave wrote:That gear cover looks good, and should be fairly safe from chipping, but I'd avoid painting suspension pieces, as you've mentioned. I did that to a xmod and it just looked a mess after a few runs.
Well damn, you're stocking up on the goodies, huh?
Those Daytona tires should be a good deal, but I'm just going to hang out for the Losi Street Meats. Since I'm sticking with the eclips, and I kinda dig the chrome dish wheels, but I am looking at some of the HR alloy wheels, more for show off than anything. I might go with the nuts so I can run those down the road.
I've painted the arms and shock towers and a few other things. They will start to be installed when the other parts arrive. I don't think I'll have too much of a problem with the paint and clear coat since I mainly run a carpet track.
The problem is my wife saw the parts I painted and now she wants me to paint parts on her's too.
I was thinking about the Street Meats but they won't be out for at least a month, Around the same time the Baja Bug and Shock tower/rear body mount that I have on order will be replaced.
Yes, and if you see a thread in 18th scale off-road about Integy you know why I am.
Posted: Sat May 26, 2007 5:16 pm
by Murdoch
have you taken this thing out in the dirt yet? Does it handle the terrain as well as a Mini-T or a RC18T?
Posted: Sat May 26, 2007 9:25 pm
by BilboBaggins
Murdoch wrote:have you taken this thing out in the dirt yet? Does it handle the terrain as well as a Mini-T or a RC18T?
The most dirt it has seen in the crud on the back alley. I haven't had a place to try it out on the dirt properly. I'm too lazy to walk the 4-5 blocks (about half a mile or .8km) to the ball field to run the bases.
Posted: Wed Jun 06, 2007 8:55 pm
by BilboBaggins
Bit's and Pieces, BITS AND PIECES. Now I have a Dave Clark Five song now stuck in my head. YES I'M OLD, Old age and treachery overcomes youth and enthusiasm.
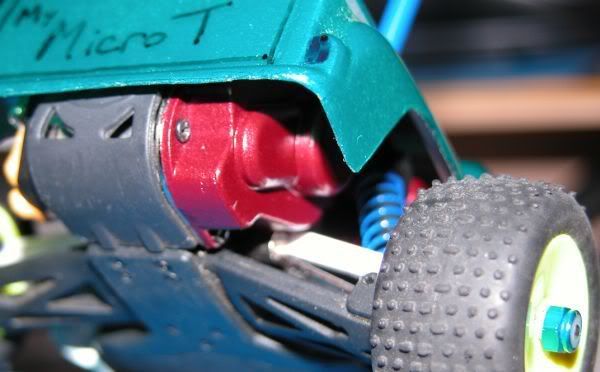
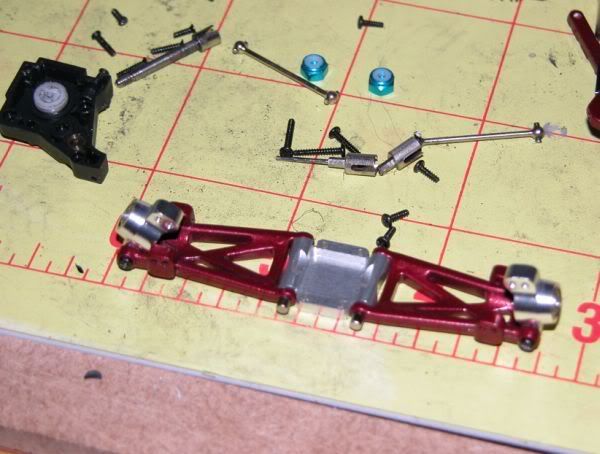
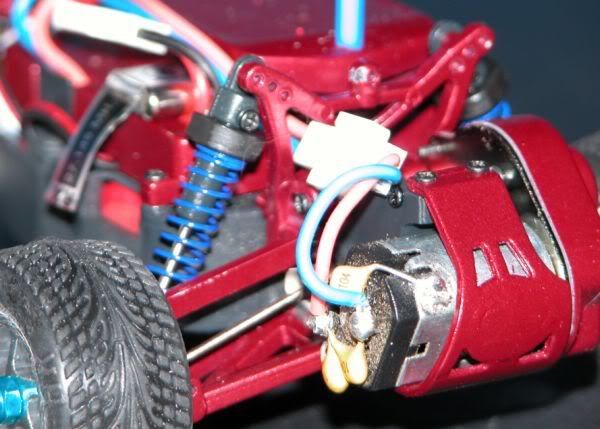
Took old reliable apart and started putting in (plus a few other parts)
Here's the front end. Aluminum Arm block, steering knuckles, Painted Arms, shock towers, front camber links and guitar pick steering links. X-Mod Evo Truck Yellow (Medium) Springs and trinity silicon diff lube in the shocks.
Now the tail. Aluminum rear arm block, Rear Hubs, Styrene Rear camber links (painted), Painted rear arms, shock tower, gear cover and motor cover. Rear Shocks have X-Mod Evo Truck Blue (Firm) Springs with Mini-T plastic bushing spacer filled with Trinity Silicon Diff lube. The second photo shows the Integy Alloy Slipper plates installed but they were removed because they were miscast (hole is round not oblong) and the stock ones reinstalled. The Delrin 50T spur gear is installed.
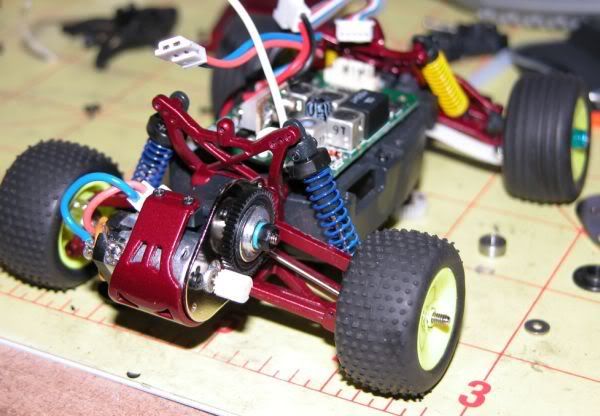
Here's a couple of shots of the truck without the body and alloy wheels and street tires installed. Integy's Alloy rims with Hot Racing's Daytona Street Meat Tires.

Now the body I'm running now is Parma's Classic Custom body for the Micro-T.
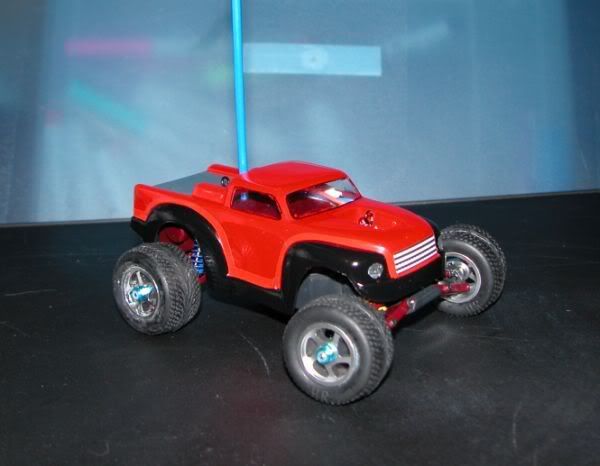
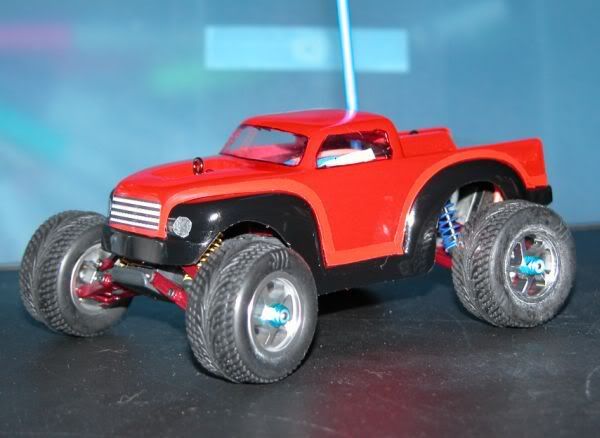
I didn't have the decal sheet for the body so I made the grill from the decal for the 18th scale grill and aluminum tape for the lights and bed and rear tail lights are from the same set.
I did pick up another Bud's Classic Hauler body that may go on here before the contest ends. I can't wait to get to the track and give it a spin.
Posted: Wed Jun 06, 2007 9:05 pm
by crazydave
Looks good. What's that spur you git in there?
Posted: Thu Jun 07, 2007 3:10 am
by nazcom83
thats kwl...

I really like the paint work, u did on the stock parts... and the new body looks sweet in red & black...