
li-poly madforce
-
ph2t
- bitPimp
- Posts: 1979
- Joined: Tue Mar 25, 2003 6:33 am
- Location: taco city
li-poly madforce
I'd thought I would post this here to help celebrate the creation of this new discussion group.
Great job again Cabo and to all the BitPimps!
I have sorta been pushing the best speed I could on the madforce for a while now and I thought that upgrading it's batteries was the next step.
I've read alot about doing 6 cells and how different PCB's are meant to handle the extra voltage and crap. In the end I took the safe route out and constructed a DC regulator circuit that keeps the original Kyosho PCB protected. Like a BEC (Battery Eliminator circuit(?) ) on a normal 1/10 ESC my custom setup maintained a constant 4.8V to the PCB.
I chose li-poly in the end for it's weight ultimately. I could of gone li-ions but 2 of them are heavier than two li-poly packs of similar capacity.

This chassis will be running a 7.4V, 850mAh li-poly battery. I will be using my nelly deluxe turbo for this. She ain't much to look at now.....but I got further. This time I'm taking it easy.

I've now confirmed that the steering works well and that the RX PCB is getting the 4.8V (exact!) from nelly deluxe. Everything is running smooth sofar.
Also testing with the multimeter on the nelly deluxe PCB I've found the new MOSFET drivers are doing their job.
Given all that, now I need to install the mosfets on nelly, at the moment she hasn't got any. I didn't want to solder them on until I have verified it was safe. I lost $20USD of fuckin mosfets the other night by being silly in my analysis and not paying attention. I definately don't want that to happen again.
The bugger works, blimey!
No fet blowouts, no overheating, nothing! Yeah, just pure acceleration. An the torque is INSANE! I've still got the challange of putting it all together but I'm sure I'll get that figured pretty quickly.
All thanks to this crap.

Due to the (reallybadformanualsoldering) package type, the n-chan mosfets are located on the other side.

Now, this is what you have to see. The video below is a very small and short one. It shows you how tyres warp so much from the sheer power this thing is puttin out! Bloody brilliant!
DivX, 250KB (0.25MB)
http://users.tpg.com.au/ph2t/lpm/wow.avi
Finally all back together.


Ok, this is it. I can't believe how fast this thing is now. It is truely insane!
Just checked it on the tammy speed checker, on a half charged li-po pack it's hitting 42Kph/26mph, it will also do backflips on command, lol.....
here's a teaser...

and here's some video outside betty's crib.
Divx, 3.5MB.
http://users.tpg.com.au/ph2t/lpm/fullysickmate.avi
ph2t.
Great job again Cabo and to all the BitPimps!
I have sorta been pushing the best speed I could on the madforce for a while now and I thought that upgrading it's batteries was the next step.
I've read alot about doing 6 cells and how different PCB's are meant to handle the extra voltage and crap. In the end I took the safe route out and constructed a DC regulator circuit that keeps the original Kyosho PCB protected. Like a BEC (Battery Eliminator circuit(?) ) on a normal 1/10 ESC my custom setup maintained a constant 4.8V to the PCB.
I chose li-poly in the end for it's weight ultimately. I could of gone li-ions but 2 of them are heavier than two li-poly packs of similar capacity.
This chassis will be running a 7.4V, 850mAh li-poly battery. I will be using my nelly deluxe turbo for this. She ain't much to look at now.....but I got further. This time I'm taking it easy.
I've now confirmed that the steering works well and that the RX PCB is getting the 4.8V (exact!) from nelly deluxe. Everything is running smooth sofar.
Also testing with the multimeter on the nelly deluxe PCB I've found the new MOSFET drivers are doing their job.
Given all that, now I need to install the mosfets on nelly, at the moment she hasn't got any. I didn't want to solder them on until I have verified it was safe. I lost $20USD of fuckin mosfets the other night by being silly in my analysis and not paying attention. I definately don't want that to happen again.
The bugger works, blimey!
No fet blowouts, no overheating, nothing! Yeah, just pure acceleration. An the torque is INSANE! I've still got the challange of putting it all together but I'm sure I'll get that figured pretty quickly.
All thanks to this crap.
Due to the (reallybadformanualsoldering) package type, the n-chan mosfets are located on the other side.
Now, this is what you have to see. The video below is a very small and short one. It shows you how tyres warp so much from the sheer power this thing is puttin out! Bloody brilliant!
DivX, 250KB (0.25MB)
http://users.tpg.com.au/ph2t/lpm/wow.avi
Finally all back together.
Ok, this is it. I can't believe how fast this thing is now. It is truely insane!
Just checked it on the tammy speed checker, on a half charged li-po pack it's hitting 42Kph/26mph, it will also do backflips on command, lol.....
here's a teaser...
and here's some video outside betty's crib.
Divx, 3.5MB.
http://users.tpg.com.au/ph2t/lpm/fullysickmate.avi
ph2t.


-
betty.k

- bitPimp
- Posts: 4090
- Joined: Fri Dec 26, 2003 4:52 pm
- Location: la la land
- Contact:


-
betty.k
- bitPimp
- Posts: 4090
- Joined: Fri Dec 26, 2003 4:52 pm
- Location: la la land
- Contact:
-
ph2t
- bitPimp
- Posts: 1979
- Joined: Tue Mar 25, 2003 6:33 am
- Location: taco city
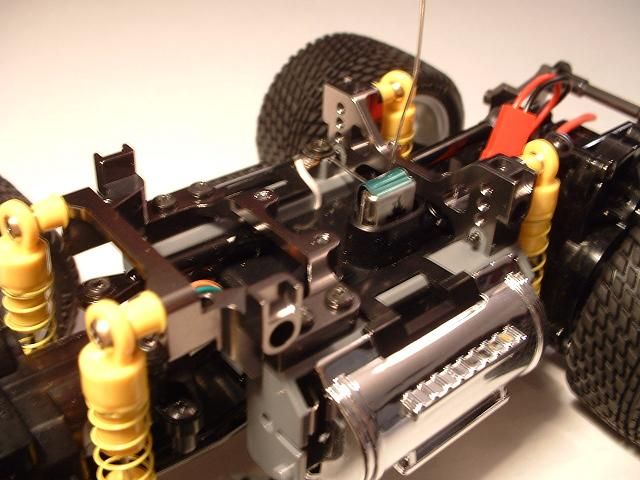
OK, lately I've been concentrating on improving the little bugger's handling. Initialy I just focused on being able to lower the chassis but in the end I also extended the wheelbase to its max.
I tried a couple of things and finally decided on this setup.

I raised the front damper mount by just simply putting some nuts in between the plastic mounts and the alloy damper. I also wrapped .2mm enamled wire around the mounts to improve their strength as on my original grey chassis they had cracked eons ago..... I used the really long screws that come in the kyosho Madforce screw set to secure the damper mounts.
The rear is still undecided. Due to the way the rear damper mount is connected to the chassis it poses a more difficult problem. This is where I just was stuffing around and came up with mounting 2 damper mounts on to ear other. I used long screws thoughout and it's OK stable. I wouldn't possibly trust it hitting a curb head on, but we'll see.....
I've also extended the wheelbase to the max. I used the shock rods from the rear on the front as well to help level out the steering that was sorta "curled up" (if you know what I mean) by the longer, lower front wheelbase.

She sits pretty well I reakon.....

Under full compression....

That's low baby! yeah! [:p]
I've also got another lipo pack that's smaller but the same voltage/capacity, I'm yet to cut out the chassis to fit it in. Sorta half undecided if I should try atomicmods' li-ions...
ph2t.
I tried a couple of things and finally decided on this setup.
I raised the front damper mount by just simply putting some nuts in between the plastic mounts and the alloy damper. I also wrapped .2mm enamled wire around the mounts to improve their strength as on my original grey chassis they had cracked eons ago..... I used the really long screws that come in the kyosho Madforce screw set to secure the damper mounts.
The rear is still undecided. Due to the way the rear damper mount is connected to the chassis it poses a more difficult problem. This is where I just was stuffing around and came up with mounting 2 damper mounts on to ear other. I used long screws thoughout and it's OK stable. I wouldn't possibly trust it hitting a curb head on, but we'll see.....
I've also extended the wheelbase to the max. I used the shock rods from the rear on the front as well to help level out the steering that was sorta "curled up" (if you know what I mean) by the longer, lower front wheelbase.
She sits pretty well I reakon.....
Under full compression....
That's low baby! yeah! [:p]
I've also got another lipo pack that's smaller but the same voltage/capacity, I'm yet to cut out the chassis to fit it in. Sorta half undecided if I should try atomicmods' li-ions...
ph2t.
-
ph2t
- bitPimp
- Posts: 1979
- Joined: Tue Mar 25, 2003 6:33 am
- Location: taco city
well, on Sunday I finally got some track time and video down.

lets just say that this little beauty was putting a few 1:10's to shame.
divx format, 5MB:
http://www.woahnelly.com/stuff/lpm/beast.avi

ph2t.
lets just say that this little beauty was putting a few 1:10's to shame.
divx format, 5MB:
http://www.woahnelly.com/stuff/lpm/beast.avi
ph2t.
-
Bird

- bitPimp
- Posts: 1303
- Joined: Sat Jan 17, 2004 2:22 am
- Location: waste mifflin, pa
-
hogjowlz

- bitPimp
- Posts: 5014
- Joined: Wed Feb 19, 2003 4:05 pm
- Location: uranus
-
Bird
- bitPimp
- Posts: 1303
- Joined: Sat Jan 17, 2004 2:22 am
- Location: waste mifflin, pa
Yeah... that's what I meant to say.hogjowlz wrote:i think they were like Croikey!!! Pissah!!!Bird wrote:
I bet those 1/10th guys were like
And ph2t was like
And after he put the spankin' on 'em they were like
bruce was like let me down a few beahs!!
and then they were like you bloody buggah!!!!
Damn man, I'm laughing too fuckin' hard right now to type right. How could people dislike you, man? You're a fuckin' riot.
-
Ahh5hit

- bitGangsta'
- Posts: 326
- Joined: Sun Jun 29, 2003 7:23 pm
- Location: Richmond, VA
ph2t, I saw your post on another forum I do not post on so I will post here...
You can lower your MMT with the new Kyosho damper mounts. They actually give you 3 positions, stock, higher, and lower.
Here is the mounts...You can see the 3 holes.
Here is the low setting on the red truck...

Here is the low setting with lowdowns...

You can lower your MMT with the new Kyosho damper mounts. They actually give you 3 positions, stock, higher, and lower.
Here is the mounts...You can see the 3 holes.
Here is the low setting on the red truck...
Here is the low setting with lowdowns...