Alloy Rim Installation – Part 2: Preparing Parts & Mounting Front Rims
by CaboWabo
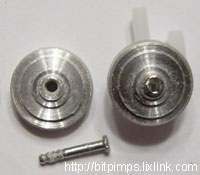
Looking at the holes in the backing of the rims, we see the holes are much too big for the rear axle or the front pins. Because we want different functions for the front and rear set of rims, we’ll start off with the rear set and make our way up to the front set as we go along.
First things first, we’re going to need to fill these holes on all 4 rim backings with epoxy, like show in the image. Make sure it’s filled completely with no air pockets in it, trim any excess with the hobby knife and leave over night to dry completely.
Once dried, take the small drill bit and drill the new holes for the pins and axle to fit in to. It is very important that we drill these holes straight, or straight as we can – if we don’t, we’ll create a “wabble”. A drill press creates the optimal results, but you can probably improvise and use a vise or something similar.
Now that we have the holes drilled, we’re going to focus on the rear axle and the rims to go on them. First, let’s note that one of our rear rims needs a nub on the outside of the rim backing to allow the rim to set away from the chassis just a tad, just like on our normal rims. Here’s another fork in the road for installation, we have two options here. We can choose to cut off the nub on the rim we previously took off the axle for this mod, or we can choose to flip the rim backing and try to use that as our nub. I recommend the first method, creating a nub, rather than the “flip” method and using the opposite side of the rim backing. I have my arguments but we won?t go in to those, the “flip” method is self explanatory so we’ll focus on creating our own nub.
Cut the nub off the rim we previously took off the axle for this mod, making sure to cut straight and clean, we’re going to be mounting this to the backside of the alloy rim directly so we want a nice smooth, even surface. Put the nub on the axle temporarily and now slide the rim backing on to the axle as well, again, making sure the rim is on straight and evenly. Take a toothpick and dab it in super glue, touch it to the under part of the nub that will contact the rim backing. Slide the nub down on to the rim backing, spin and move the axle back and forth while the super glue dries so we don?t accidentally glue the nub and rim to the axle.
 Now let’s focus on the front set of rim backings. Mount the rim to the pin, we want the rim to spin freely, smoothly, and evenly on the pin. If we notice that any of these are not true, then we’ve got just a little fine tuning to do. Just as we straightened out the holes for the rear set by filing with our drill bit, we can do the same for the front set. Again, our focus here is to get the rim to spin freely, smoothly, and evenly – no wabbles. Once we’re satisfied, we can just finish mounting the front rims by pushing the pins with the rim backings in place, back on to the knuckles. Make sure not to leave too much pin sticking out the rim backing or we won’t be able to mount our hub correctly. Make sure everything spins freely, smoothly, and evenly again.


