Making Your Own Truck Body
by CaboWabo
We’re just gonna dive right in here…
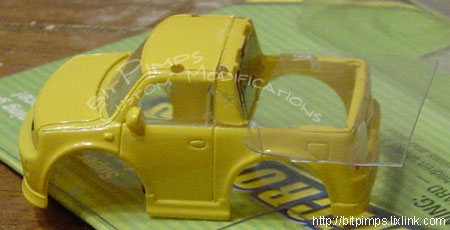
First, you want to take your Bb body and chop off the back piece like you see in the picture above. Make sure to cut carefully, you don’t want to ruin the edges around your cut. Keep what is to be trucks “cab” in tact, shave the body down to where you meet the driver’s and passenger’s side windows.
Next, on the back piece you just cut off, you want to shave that down past the windows, leaving just a small piece as shown above. Again, make sure your cuts are straight and smooth as possible because next you’re going to have to sand to make sure both parts fit together evenly. This is essential as it is the “cab” of the truck – one of the most visible parts of the body so take the time to do it good.
After you’ve finished sanding and smoothing out the edges for the best possible fit, super glue those two pieces together to create the “cab” of the truck. Be careful not to use too much super glue or it’ll eat into your plastic and ruin your windows and possibley your body if you’ve used way too much. After you glue it on, you might notice still some descrepencies in the fit – one side might be slightly raised and the other even. You’ll also still notice the holes in the “cab” of the truck where the luggage rack bars originally went. Not to worry, we’ll deal with that in a bit – moving on.
Now we want to create a “cover” for the “bed” of our truck. This relatively easy – just snag some thin plastic to work with – I used the plastic that a body set came in. Just cut off a square larger than the “bed” of the truck. When you cut out this piece of plastic, even though it’s over-sized, you’ll be doing yourself a favor if you have at least 1 straight edge, prefferably 2 straight edges of plastic. Put the straighest edge you have up against the “cab” of the truck, you’re next most straight edge can go on either the driver’s or passenger’s side of the “bed”. Allow a little bit of the plastic to overhang on all 3 sides. Super glue the plastic to the body.
Once dried, use an x-acto knife to start cutting off the excess overhang. Cut as close to the body as possible without actually cutting in to the body itself. Take your time – it’s easy to slip and scratch something you don’t want to like a window. Once you’re done, hit the edges with a light grade sandpaper to help get the edges to blend in to the body. Don’t sand too hard or too much, we’ve got other plans to make these seems disappear.
As promised, now we’re going to fill in any holes, gaps, creases, etc. Don’t just cake on a huge glob of putty. You want to actually work the putty in to the cracks and holes or whatever you have to be filled and smoothed out. Let this dry completely before you even think of grabbing some sand paper or you’ll sand off in chunks… not good.
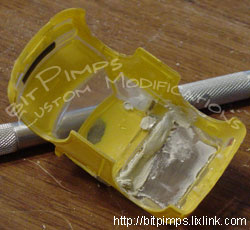
Now let’s take a peek at the inside of the body, this is rather important too as we need to make sure our chassis fits under the newly modified body. You’ll notice that the back window on the “cab” of the truck hangs down lower than where the “cover” for the “bed” of the truck meets the window. You might even have a few gaps where they meet – again not to worry. Fill that up with some putty and let it dry before you do anything. If you start messing with it before it’s dried, you’re going to cause more problems for yourself.
Ok, now that everything is all dried up, lets cut, dremel or whatever you have to do to get that overhang out from the inside of the body. You need to get this out or your PCB cover might rub against it, especially if you plan on lowering your truck. Keep sanding, cutting, grinding, or whatever until it’s close to being flush. It doesn’t have to be perfect, but you do want most of that overhang gone.
Flip the body and start sanding down where the putty is. Use a fine grit sandpaper and keep going until you get close to the smooth results you’re looking for. Once you’ve reached that point – it would be wise to get some micro-fine grit sand paper and start wet-sanding. Wet sand until everything feels as smooth as a babies bottom, smooth the spots where we’ve glued the cover of the bed to the body especially. Keep a close eye on where your sand paper is going, you don’t wanna scratch up those windows too bad! Keep sanding until you think you’ve gotten all the tell tale lines and creavases out.
After you’re all done wet-sanding and the body is completely dried – hit it with a very light coat of primer. This should help any other flaws show up. If you see any, add more putty if necessary and start wet sanding again. Do the process over and over until you are satisfied.
 When you’re satisfied, hit the body again with a light coat of primer – hopefully you don’t see anything you don’t like. If you do – you can try the process again, but be warned, the more you do – the more likely it won’t turn out like you want.
That’s it – you should be ready to paint your new truck body. Hope this helps some of you pimps out. Good luck!


